How to Make Creamy Rice Pudding in an Air Fryer (Yes, Really!)
The “Wait, You Can Do That?” Guide to Making Rice Pudding in an Air Fryer
I know what you’re thinking. You read that title and your brain glitched a little. “Rice pudding… in an air fryer?” It sounds like a culinary contradiction, a recipe written by a rogue AI after scanning a list of random kitchen appliances and comfort foods. An air fryer is for making things crispy and fast. Rice pudding is for slow, creamy, stovetop stirring. But what if I told you that your air fryer is hiding a secret talent? It’s time to learn how to make rice pudding in an air fryer, and it’s about to become your new favorite “lazy genius” dessert hack.
Forget standing over a hot stove, stirring constantly to prevent a scorched, sticky mess. We’re about to use our favorite countertop gadget to create a small, perfect batch of the creamiest, most comforting rice pudding, complete with a delicious, golden, caramelized top. This is pure magic.
Why This Method is a Comfort Food Miracle
So, why would you ever attempt this seemingly insane feat of cookery?
- It’s a “Set It and (Mostly) Forget It” Dream: The biggest downside of stovetop rice pudding is the constant, needy stirring. This air fryer method is way more hands-off. You give it one good stir halfway through, and that’s it. No more being chained to the stove.
- The Texture is Unbelievable: This method creates the best of both worlds. The inside is incredibly rich and creamy, while the top develops a beautiful, golden-brown “skin,” just like a classic baked rice pudding. You get a custard-like texture that’s simply divine.
- Perfect for Small Batches: Don’t want to make a giant, family-sized pot of rice pudding? This method is perfect for making just two or three servings—the ideal amount for a cozy night in without a week’s worth of leftovers.
The Ingredient List: The Anatomy of Comfort
We’re using classic, simple ingredients for a timelessly delicious result.
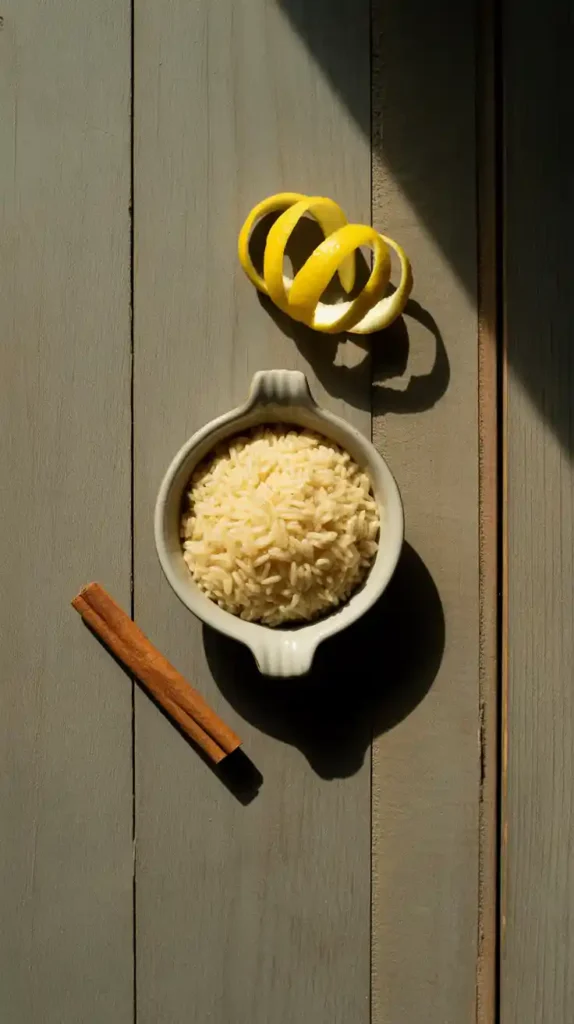
- Short-Grain Rice: ½ cup. Arborio rice (yes, the kind for risotto) is the absolute best choice. Its high starch content is the secret to an ultra-creamy pudding.
- Whole Milk: 2 cups.
- Heavy Cream: ½ cup. For extra richness.
- Granulated Sugar: ⅓ cup.
- A Pinch of Salt.
- The Aromatics:
- 1 Cinnamon Stick
- 1 wide strip of Lemon or Orange Peel
- Vanilla Extract: 1 teaspoon, stirred in at the end.
Tools & Kitchen Gadgets: Your Pudding Pod
To make a wet dish in a dry appliance, you need one very specific, very important tool.
- An Air Fryer: The star of our weird science experiment.
- A Small, Deep, Oven-Safe Baking Dish: This is absolutely non-negotiable. You need a dish that will fit comfortably inside your air fryer basket with a little room for air to circulate. A 6-inch round cake pan or a large, 20-oz ramekin is perfect.
- Aluminum Foil.
- A Small Saucepan.
- A Whisk.
Step-by-Step Instructions: The Path to Creamy Perfection
Ready to try this crazy experiment? Trust the process. It works.
Step 1: The Prep
First, rinse your Arborio rice under cold water until the water runs mostly clear. This removes the surface starch and prevents a gummy texture. Set it aside.
In your small saucepan, combine the whole milk, heavy cream, cinnamon stick, and lemon peel. Heat over medium heat until it’s hot and just beginning to simmer around the edges. Don’t let it boil.
Step 2: The Combination

Place your rinsed rice, sugar, and a pinch of salt into your air-fryer-safe baking dish. Carefully pour the hot milk mixture over the rice (you can fish out the cinnamon and peel now, or leave them in for more flavor). Whisk everything together until the sugar is dissolved.
Step 3: The First Bake (Covered)
Preheat your air fryer to 320°F (160°C). Cover your baking dish tightly with aluminum foil. This is a crucial step that traps the steam and allows the rice to cook gently.
Carefully place the foil-covered dish into the preheated air fryer basket. Cook for 20 minutes.
Step 4: The All-Important Stir
After 20 minutes, carefully remove the hot dish from the air fryer. Take off the foil and give the rice pudding a very vigorous stir with a whisk. Scrape the bottom and sides to make sure no rice is sticking. The mixture will look a bit soupy at this point; this is normal.
Step 5: The Second Bake (Uncovered)
Place the uncovered dish back into the air fryer. Cook for another 15-20 minutes at 320°F (160°C). This is when the magic happens. The pudding will thicken up beautifully, and the top will develop a lovely, golden-brown, caramelized skin.
Step 6: The Final Touches
Carefully remove the dish from the air fryer. The pudding will look a little loose, but it will thicken significantly as it cools. Let it cool for at least 15-20 minutes. Stir in your vanilla extract. Serve warm with an extra sprinkle of cinnamon, or chill it completely to enjoy cold.
Calories & Nutritional Info (A Hug in a Bowl)

This is the very definition of comfort food. It’s here to make you feel good.
- Serving Size: A cozy ½ cup portion.
- Calories: Approximately 250-300 kcal.
- Good For: A rainy day, a bad day, a good day, basically any day.
- Main Nutrient: Pure, unadulterated comfort.
Common Mistakes to Avoid (Pudding Problems)
- Using the Wrong Dish (or No Dish!): I know it has to be said. Do not pour this mixture directly into your air fryer basket unless you enjoy cleaning up a milky, sticky, burnt-on disaster. You must use a deep, oven-safe dish that fits inside your air fryer.
- Forgetting the Foil: The foil is essential for the first half of the cooking. Without it, the top of your pudding will form a hard, burnt crust long before the rice underneath has had a chance to absorb the liquid and cook.
- Skipping the Halfway Stir: If you don’t stir it, the rice will settle on the bottom and burn, while the top remains soupy. That vigorous halfway stir is what helps release the starches and ensures a creamy, evenly cooked result.
- Using the Wrong Kind of Rice: This recipe is designed for a starchy, short-grain rice like Arborio. If you use a long-grain rice like Basmati or Jasmine, it won’t release enough starch, and you’ll end up with a much thinner, less creamy pudding.
Variations & Customizations (Choose Your Comfort)
The classic is divine, but here are a few ways to customize your creamy creation.
1. The Coconut Cream Dream (Vegan / Dairy-Free)
For a delicious dairy-free version, replace the whole milk and heavy cream with an equal amount of full-fat canned coconut milk. Use coconut sugar instead of granulated sugar and add a pinch of cardamom for a lovely, warm spice note.
2. The Chai-Spiced Rice Pudding
A wonderfully fragrant and cozy variation. In the initial milk-heating step, add two black chai tea bags along with your cinnamon stick. Let them steep for about 10 minutes before you pour the milk over the rice.
3. The “Rice Pudding Brûlée”
The ultimate fancy upgrade. After your rice pudding is fully cooked, let it chill completely in the fridge. Just before serving, sprinkle a thin, even layer of granulated sugar over the top. Use a kitchen torch to carefully melt and caramelize the sugar until it forms a hard, crackly crust. It’s an incredible contrast of textures.
FAQ: Your Most Pressing Pudding Questions
Can I really make a wet dish like this in an air fryer?
Yes! The trick is to remember that an air fryer is essentially a small, very powerful convection oven. By using an oven-safe dish inside the basket, you can bake or roast anything you would in a regular oven, just faster and in a smaller batch.
What’s the best kind of rice for rice pudding?
Short-grain rice is a must. Arborio rice is the king because of its high starch content, which creates a naturally creamy texture. Other great options include Calrose rice or any rice specifically labeled as “pudding rice.”
Can I use leftover cooked rice to make this?
Yes, you can make a “cheater’s” version! Just combine about 2 cups of cooked rice with 1.5 cups of milk, your sugar, and flavorings in your oven-safe dish. You’ll only need to cook it for about 15-20 minutes (uncovered) at 320°F (160°C), just to heat it through and thicken it up.
How do I store leftovers?
Store any leftover rice pudding in an airtight container in the refrigerator for up to 3-4 days. Be aware that it will thicken up considerably when it’s cold.
Can I serve this rice pudding cold?
Absolutely! It’s delicious served warm right after it’s made, but it’s also fantastic served cold straight from the fridge the next day.
Final Thoughts

You’ve done it. You have defied logic and reason. You have taken an appliance designed to make things crispy and you have made the creamiest, dreamiest rice pudding imaginable. You are a culinary rebel, a pioneer of the pudding arts.
So go on, enjoy your delicious experiment. Savor that warm, creamy, cinnamon-kissed goodness. You’ve just discovered another one of your air fryer’s secret talents, and your dessert game will never be the same.