How to Make the Best Chewy Chocolate Chip Cookies
The Only Chocolate Chip Cookie Recipe You’ll Ever Need
Let’s be brutally honest with each other. Everyone thinks they have a good chocolate chip cookie recipe. Your grandma has one, your neighbor has one, that random blog you found in 2012 has one. But most of them are… fine. They’re either too flat, too cakey, too crispy, or they have the texture of a sandy biscuit. You deserve better. We all deserve better.
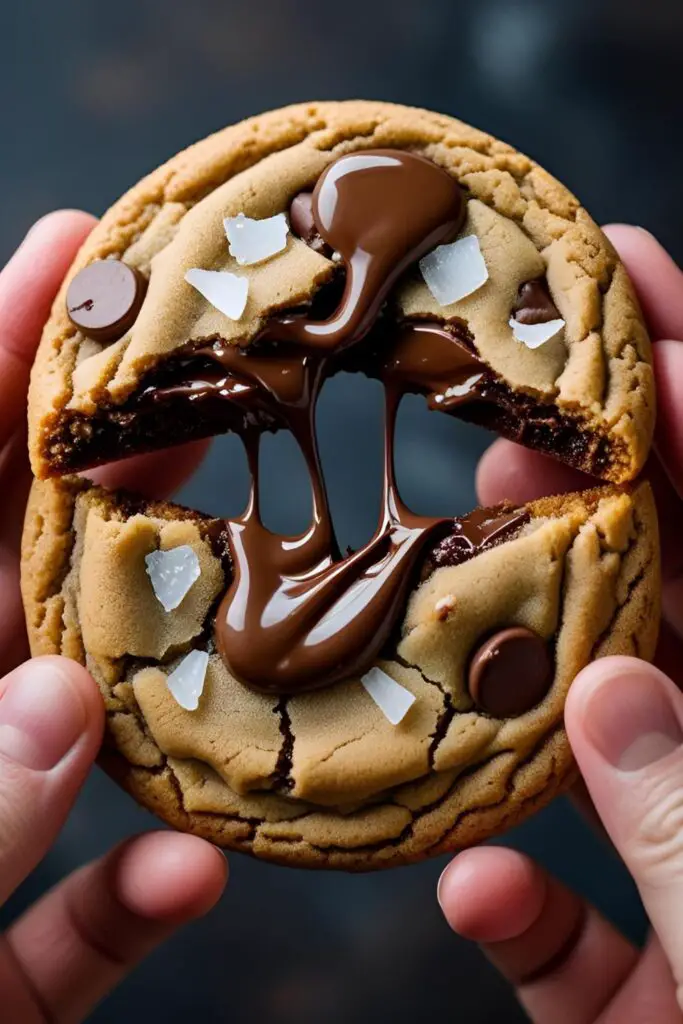
This isn’t just another guide on how to make chocolate chip cookies. This is your intervention. This is the recipe that ends your search. We’re talking about a cookie with crispy, caramelized edges, a ridiculously soft and chewy center, and deep, rich flavor that will make you wonder what you’ve been doing with your life. Prepare to become a cookie legend.
Why This Recipe Will Ruin You (In the Best Way)
So what makes this the one true cookie recipe? Why should you devote your precious butter and chocolate to this specific set of instructions?
First, the texture is a masterclass in cookie perfection. We’re using a few key tricks—like melted butter and an extra egg yolk—to guarantee a cookie that is supremely chewy and stays soft for days. No more cookies that could double as a hockey puck by day two.
Second, the flavor is on another level. Using more brown sugar than white gives these cookies a deep, caramel-like richness. A sprinkle of flaky sea salt on top cuts through the sweetness and makes the chocolate flavor explode. These aren’t just sweet; they’re complex and utterly addictive. You will be the hero of every bake sale, office party, and late-night craving session.
The A-List: Your Cookie Ingredients
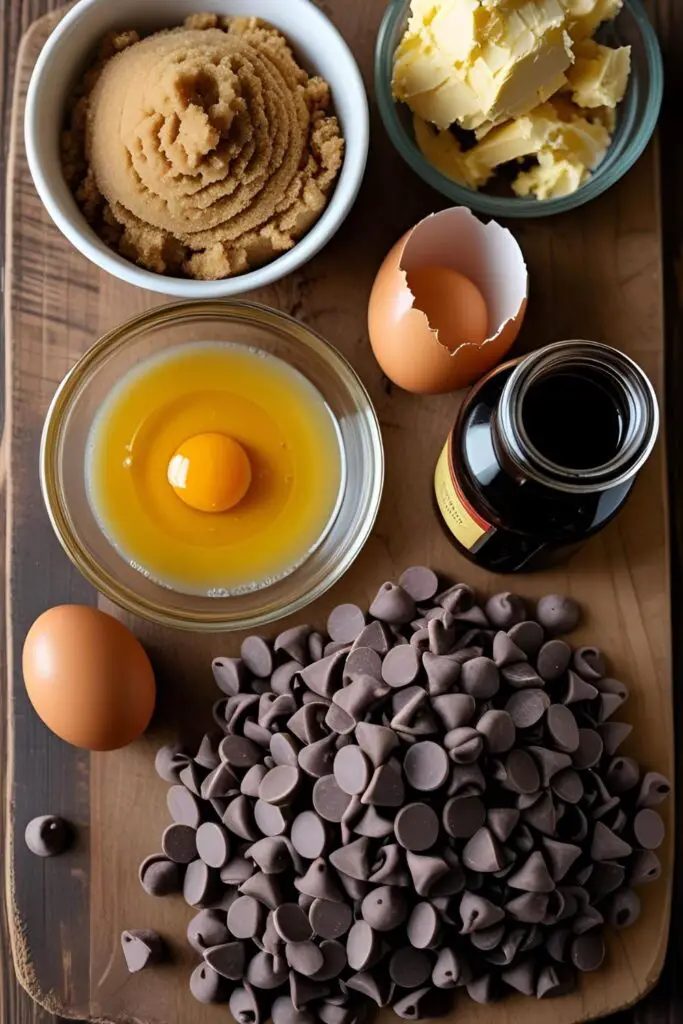
To achieve cookie nirvana, you need the right players. No divas, just reliable all-stars.
- Unsalted Butter: 1 cup (227g), melted and slightly cooled. Melted butter is key for a chewier cookie.
- Brown Sugar: 1 cup (220g), packed. Light or dark brown sugar works. Dark will give you a deeper molasses flavor.
- Granulated Sugar: 1/2 cup (100g). The combo of sugars creates the perfect flavor and texture.
- Eggs: 1 large egg + 1 large egg yolk, at room temperature. The extra yolk adds richness and chewiness. This is a non-negotiable secret weapon.
- Good Vanilla Extract: 2 teaspoons. Use the best you can afford. It makes a difference.
- All-Purpose Flour: 241 cups (270g). You can also use bread flour for an even chewier cookie!
- Baking Soda: 1 teaspoon.
- Salt: 1/2 teaspoon. For the dough.
- Chocolate Chips & Chunks: About 121 cups (270g). I highly recommend a mix of semi-sweet chocolate chips AND a chopped semi-sweet or dark chocolate bar. The bar creates those glorious melted puddles of chocolate.
- Flaky Sea Salt (like Maldon): For finishing. This is not optional if you want to ascend to a higher plane of cookie existence.
Your Baking Toolkit
You don’t need a ton of fancy gear, but these tools will make your cookie journey a smooth one.
- A Large Mixing Bowl: And a strong arm with a whisk, or an electric hand mixer. A stand mixer is great too.
- Baking Sheets: At least two, so you can rotate them. Heavy-duty, light-colored aluminum sheets are best for even baking.
- Parchment Paper or Silicone Baking Mats: This is non-negotiable. It prevents your cookies from sticking and helps them bake evenly.
- A Cookie Scoop: This is the secret to getting uniformly sized and shaped cookies, which helps them bake at the same rate. A 1.5 or 2-tablespoon scoop is perfect.
- Wire Cooling Rack: To let your cookies cool properly and prevent them from getting soggy on the bottom.
Let’s Make Some Magic: Step-by-Step to Perfection
Ready to change your life? Let’s bake some cookies.
Step 1: Combine the Wet Ingredients

In a large bowl, whisk together the melted butter, brown sugar, and granulated sugar until fully combined. The mixture will look like glossy, wet sand.
Add the egg, egg yolk, and vanilla extract. Whisk vigorously for about a minute until the mixture is lighter in color and texture.
Step 2: The Dry Ingredients Get Together
In a separate medium bowl, whisk together the flour, baking soda, and salt. This ensures everything is evenly distributed before it hits the wet ingredients.
Step 3: Combine and Conquer
Add the dry ingredients to the wet ingredients and fold them together with a spatula until just combined. There should still be a few streaks of flour. Do not overmix! Overmixing develops gluten and leads to tough cookies.
Step 4: The Chocolate Invasion
Add your glorious mix of chocolate chips and chopped chocolate to the dough. Fold them in gently until they are evenly distributed. Now you have cookie dough. But you are not done. Not even close.
Step 5: The Agonizing But Absolutely Crucial Wait
This is the most important step in the entire recipe. Cover the bowl with plastic wrap and chill the dough in the refrigerator for at least 2 hours. You can even chill it for up to 72 hours.
Why? Chilling the dough solidifies the fat, which means your cookies will spread less and bake up thicker and chewier. But more importantly, it allows the flour to hydrate and the flavors to meld, resulting in a deeper, more complex-tasting cookie. Do not skip this step! Go watch an episode of something. Take a nap. Your patience will be rewarded.
Step 6: Scoop and Bake
When you’re ready to bake, preheat your oven to 375°F(190°C). Line your baking sheets with parchment paper.

Use your cookie scoop to portion out balls of the chilled dough onto the prepared baking sheets, leaving about 2 inches of space between them.
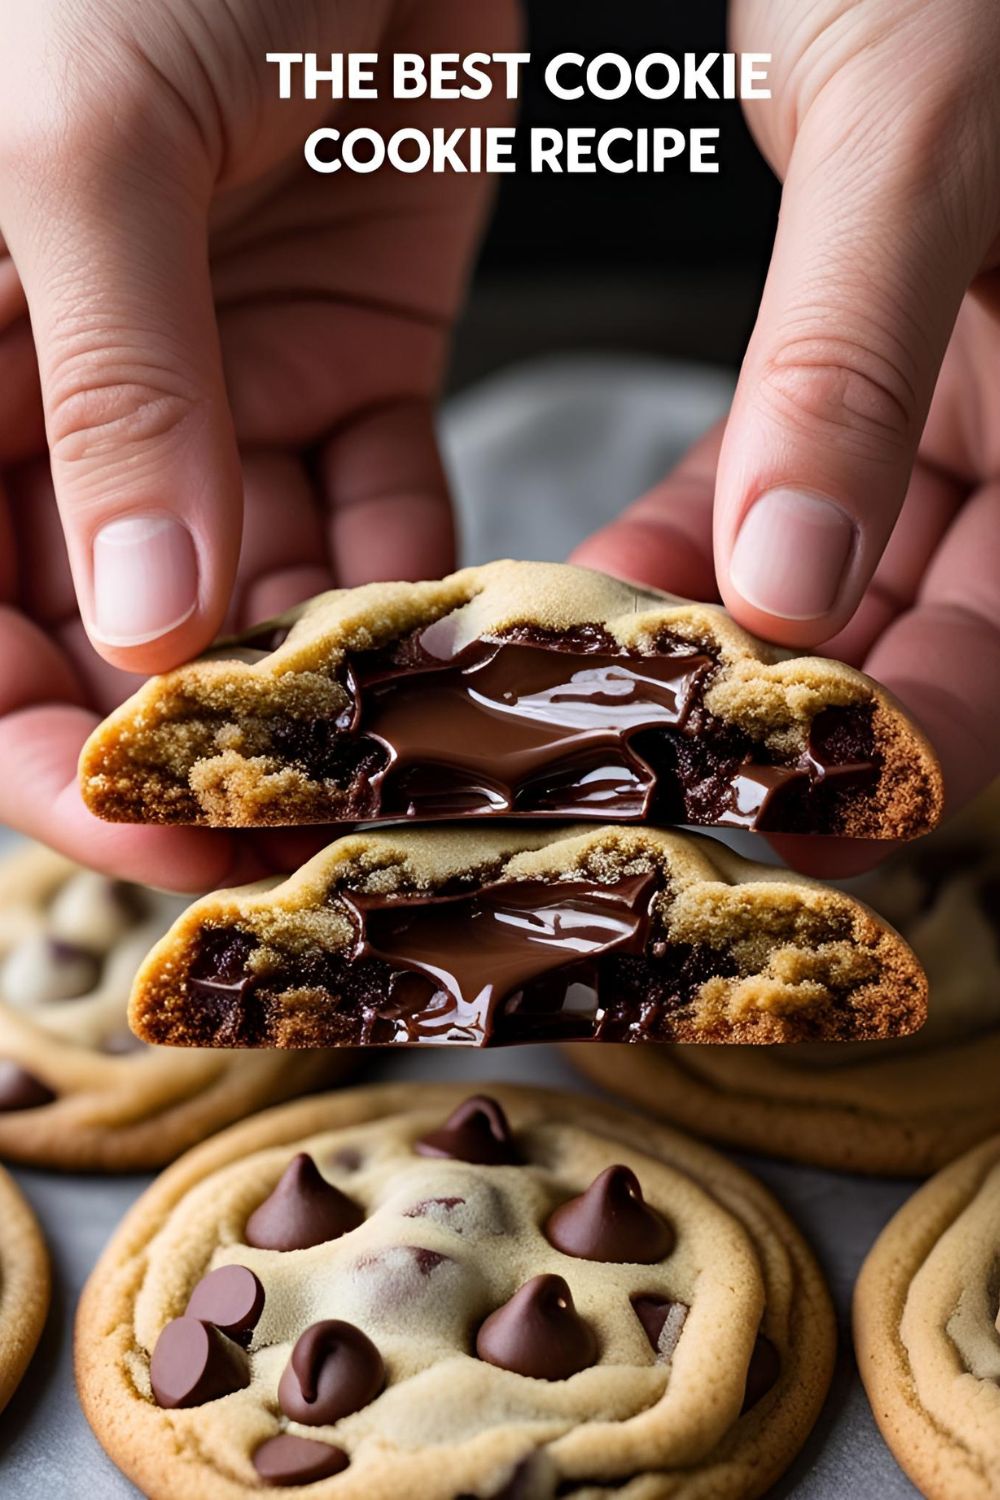
Bake for 10-12 minutes, or until the edges are golden brown but the centers still look slightly soft and underdone. The cookies will continue to cook on the hot pan after you remove them from the oven.
Step 7: The Salty Finish
As soon as you take the cookies out of the oven, sprinkle each one with a little flaky sea salt. The salt will adhere to the hot, melty chocolate and look beautiful. Let the cookies cool on the baking sheet for 5-10 minutes before transferring them to a wire rack to cool completely.
The Nutritional Reality Check
For those of you who like to live life on the edge and read the nutritional info.
- Serving Size: 1 perfect cookie
- Estimated Calories: ~220 kcal
- Happiness Level: Immeasurable
- Willpower Required to Stop at One: Superhuman
- Note: This is soul food. The nutritional value is in how it makes you feel. 🙂
Cookie Crimes: Common Mistakes to Avoid
- Skipping the Chill: This is the #1 sin of cookie baking. It results in sad, flat, overly greasy cookies that spread into one giant cookie-puddle. The Fix: Just chill the dough. I promise it’s worth it.
- Overbaking: You pulled them out when they looked completely “done.” The Fix: Trust the process. Pull your cookies from the oven when the centers still look a little gooey and soft. They will set up perfectly as they cool on the hot pan.
- Using Hot Butter: You melted your butter and immediately threw it in with the sugar and eggs. The Fix: Let your melted butter cool down for 5-10 minutes. If it’s too hot, it can start to cook the eggs.
- Not Measuring Flour Correctly: You scooped your measuring cup right into the flour bag. The Fix: This packs in too much flour and leads to dry, cakey cookies. Use the spoon and level method: spoon flour into the cup, then level it with a knife.
The Remix: Fun Variations
Once you’ve perfected the classic, try these fun twists.
- The Nutty Professor: Add 1 cup of toasted, chopped walnuts or pecans along with the chocolate chips. The toasty, buttery flavor of the nuts is a perfect match.
- The Salty-Sweet Fiend: Reduce the chocolate to 1 cup and add 3/4 cup of crushed potato chips or pretzels to the dough. The crunchy, salty kick is incredible.
- The Triple Chocolate Threat: Use an equal mix of dark chocolate, milk chocolate, and white chocolate chips or chunks for a truly decadent experience.
Your Burning Cookie Questions, Answered
Why did my cookies spread so much and get super flat?
Nine times out of ten, it’s because you didn’t chill your dough long enough. Other culprits can be an oven that isn’t hot enough or using butter that was too soft or hot.
Can I make the cookie dough ahead of time?
Yes! In fact, the flavor gets better with time. You can keep the dough in the fridge for up to 3 days.
How do I get my cookies perfectly round?
A cookie scoop is the best way to get them uniform. For an extra trick, as soon as the cookies come out of the oven, take a round glass or cookie cutter that’s slightly larger than the cookie and “scoot” it around the edges of the hot cookie to nudge it into a perfect circle.
Chewy vs. crispy cookies: what’s the difference?

It’s a science! Chewy cookies often have a higher ratio of brown sugar to white, use melted butter, and might have an extra egg yolk—all things that increase moisture. Crispier cookies often use more white sugar and softened (creamed) butter, which incorporates more air.
Can I freeze this cookie dough?
Absolutely. Scoop the dough balls onto a parchment-lined tray, freeze until solid, then transfer them to a freezer bag. You can bake them straight from frozen; just add 2-3 minutes to the baking time.
Why are my cookies cakey instead of chewy?
This usually means there’s too much flour in your dough. Be sure you are measuring your flour correctly using the spoon and level method, not by packing the cup into the bag.
What’s the best kind of chocolate to use?
A mix is best! Using standard chocolate chips ensures you get that classic chip shape throughout. Using a chopped chocolate bar (like Ghirardelli or a good baking bar) provides shards and chunks that melt into luscious pools of chocolate.
Final Thoughts: You Are Now a Cookie Master
There you have it. You now possess the knowledge, the power, and the recipe to create genuinely life-changing chocolate chip cookies. You are officially the person who will be begged to “bring those cookies” to every future gathering.
So go forth, bake a batch, and share them (or don’t, I won’t judge). Your days of accepting mediocre, store-bought cookies are over. Welcome to the big leagues.