How to Make Puff Pastry Dough From Scratch (The “Lazy” Way!)
How to Make Puff Pastry Dough From Scratch (The “Lazy,” Brilliant Way!)
Puff pastry. The final boss of the baking world. It’s the stuff of legends, a mythical beast with a thousand flaky, buttery layers that shatter at the slightest touch. We’re taught that making it from scratch is a sacred, week-long art form, best left to French pastry chefs with intimidating hats and a lineage of butter-laminating ancestors. To even attempt it, we assume, is to invite failure and despair into our kitchens.
Well, I’m here to tell you that’s a bunch of buttery nonsense. What if I told you there’s a shortcut? A brilliant, slightly rebellious method that gives you jaw-droppingly flaky, all-butter puff pastry with a fraction of the work? Today, you’re going to learn how to make puff pastry dough using this “rough puff” technique, and you’re going to wonder why you were ever afraid.
Why This Recipe Is a Baking Revelation
So, why should you embark on this pastry adventure instead of just grabbing that box from the freezer aisle? Let me count the ways.
First, this is the ultimate baking hack. This “rough puff” or “blitz” pastry gives you 90% of the spectacular, flaky result of classic puff pastry with about 10% of the painstaking, traditional effort. It’s the perfect intersection of impressive and intelligent. You get all the glory with none of the agony.
Second, the flavor and texture are out of this world. Store-bought puff pastry is often made with shortening or other fats, leaving it tasting bland and waxy. This recipe uses one simple, glorious fat: pure butter. The taste is rich, the aroma is heavenly, and the shatteringly crisp, flaky layers are something you just can’t get from a box.
Finally, you will feel like a baking superhero. When you pull a tray of perfectly risen, golden-brown pastries from the oven and casually mention, “Oh yeah, I made the puff pastry from scratch,” you will unlock a new level of respect and awe from your friends and family. It’s a skill that instantly elevates you to legendary baker status.
The (Deceptively Simple) Ingredients List
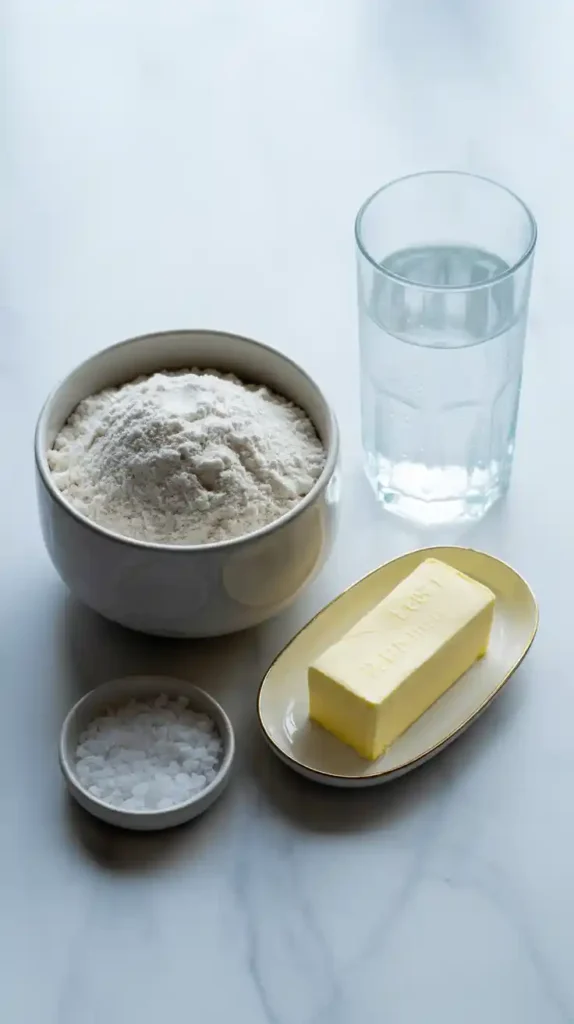
The magic here isn’t in a long list of fancy ingredients; it’s all in the technique. You only need four basic things.
- All-Purpose Flour: 2 cups (about 250g).
- Fine Sea Salt: 1 teaspoon.
- Very Cold Unsalted Butter: 1 cup (2 sticks or 226g). This is the most important ingredient. It must be cold, cold, cold. Cut it into ½-inch cubes and then throw it back in the freezer for 15 minutes before you start.
- Ice Cold Water: ½ cup (120ml). Start with a cup of water and a bunch of ice cubes to make sure it’s frigid.
The Unbreakable Commandment of Puff Pastry: I’m going to say this now, and I’ll say it again. Keep. Everything. Cold. Your butter, your water, your work surface, your hands, your very soul. Heat is the villain of this story. Cold butter creates steam in the oven, which creates the “puff.” Warm butter melts into the dough, which creates a tough, greasy cracker. We are not making crackers today.
The Pastry Chef’s Toolkit

You don’t need a professional pastry brake, but these tools will make you feel like you have one.
- A Large Mixing Bowl: To start your dough.
- A Pastry Blender or Your Fingertips: For the initial cutting-in of the butter.
- A Rolling Pin: Your primary weapon in the battle for flaky layers.
- A Bench Scraper: Incredibly helpful for folding the dough cleanly and keeping your work surface tidy.
- Plastic Wrap: For the all-important chilling periods.
- A Ruler or Tape Measure (Optional but great for beginners): Helps you roll your dough into precise rectangles, which makes folding much neater.
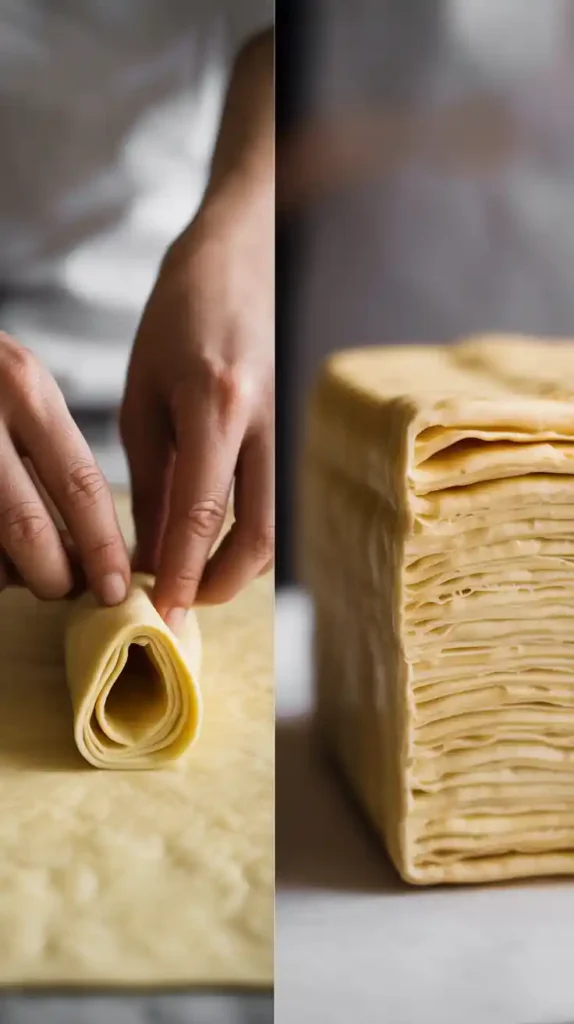
Step-by-Step: The Art of Lamination (The Easy Way)
This process is a rhythm of rolling, folding, and chilling. We call the folds “turns.” It’s less of a recipe and more of a dance. Put on some music and let’s go.
Phase 1: Creating the Shaggy Dough
- In a large, chilled bowl, whisk together the flour and salt.
- Add your freezer-cold, cubed butter to the flour. Using a pastry blender or the tips of your fingers, quickly cut the butter into the flour.
- Work quickly until the largest pieces of butter are about the size of a walnut and the rest are like peas and coarse crumbs. You want to see big, distinct chunks of butter. This is the “rough” part of rough puff.
- Create a well in the center and pour in about half of the ice-cold water. Use a fork to toss the flour into the water until a shaggy dough begins to form. Add more water, a tablespoon at a time, until the dough just barely comes together when you squeeze it. Do not add too much water!
- Turn the shaggy mess onto your work surface and gently pat it into a rough rectangle. Don’t knead it! Wrap it tightly in plastic wrap and refrigerate for 30 minutes.
Phase 2: The Turns (Building the Layers)
- The First Turn: Lightly flour your work surface and your rolling pin. Unwrap your chilled dough. Roll it out into a long rectangle, about 15 inches by 8 inches. Now, perform a “letter fold”: Fold the bottom third of the rectangle up to the middle, then fold the top third down over it, like you’re folding a business letter. You should have a smaller, thicker rectangle. That’s one turn!
- Rotate and Repeat: Rotate the block of dough 90 degrees (a quarter turn). Roll it out again into a 15×8 inch rectangle. Perform another letter fold. That’s two turns!
- The First Chill: Wrap your dough tightly in plastic wrap and refrigerate for at least 45-60 minutes. This is not optional. It lets the gluten relax and, most importantly, keeps that butter nice and solid.
- Repeat the Process: Take the chilled dough out of the fridge. Do two more turns (roll, fold, rotate, roll, fold).
- The Second Chill: Wrap it up again and refrigerate for at least another hour, or up to two days. You have now completed four turns. For extra flaky pastry, you can do a final set of two turns after this chill, for a total of six.
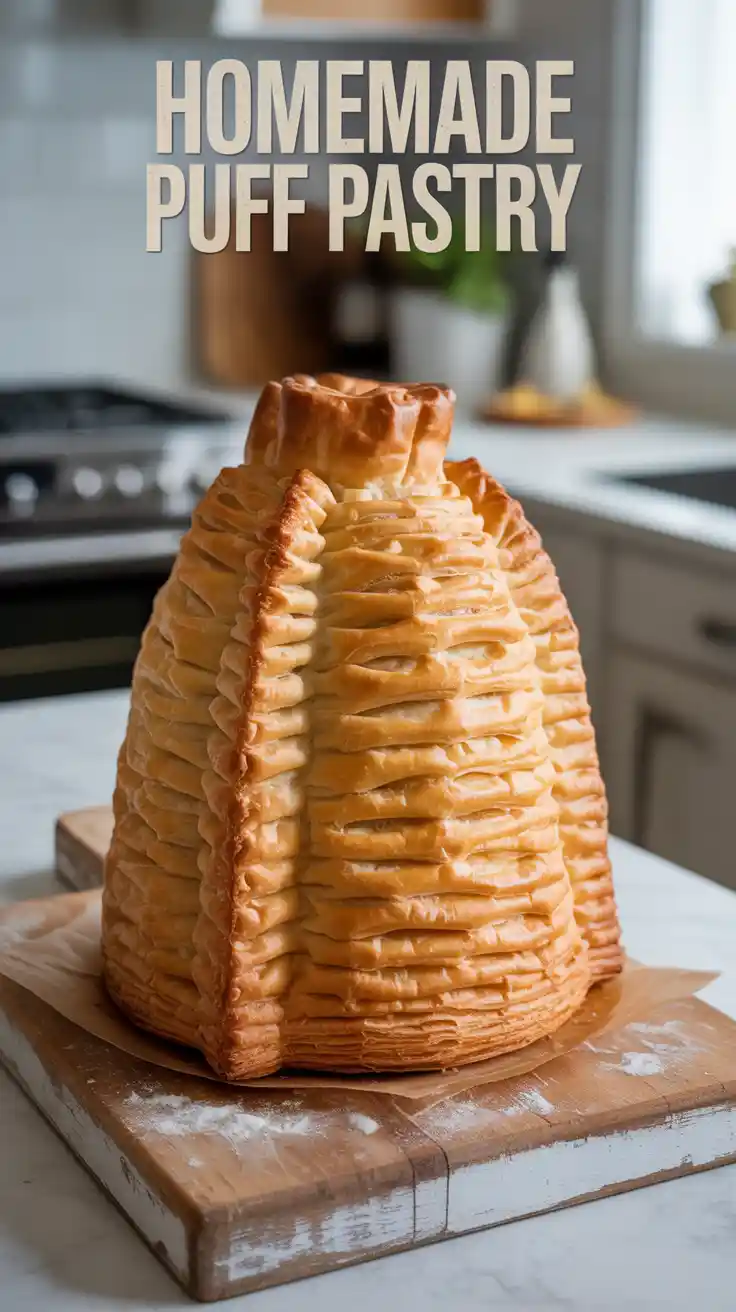
Congratulations. You have just made puff pastry.
The Science Corner: So, How Does It “Puff”?
Wondering what you actually just accomplished? You became a master of lamination.
- What is Lamination? Lamination is the process of creating hundreds, or even thousands, of super-thin, alternating layers of dough and fat (in our case, glorious butter). Each time you roll and fold (“turn”) the dough, you are multiplying the number of layers.
- How Does it “Puff”? When your cold puff pastry hits a hot oven, the water content in those solid layers of butter instantly turns into steam. This steam has nowhere to go, so it violently pushes the layers of dough apart, creating that incredible lift, the airy pockets, and that signature flaky, shattering texture. It’s not magic; it’s physics!
- Why Cold is King: If your butter is warm, it will just melt into the dough instead of staying in distinct layers. With no separate layers, there’s no steam explosion, no puff, and no flaky masterpiece. You just get a hard, greasy slab.
Common Puff Pastry Pitfalls to Avoid
This dough can be temperamental. Here’s how to avoid making it angry.
- The Sin of Warm Butter. I will say it until I am blue in the face. If your butter gets soft and greasy at any point, STOP. Put the dough in the fridge immediately. Warm butter is the number one killer of puff pastry.
- The Gluten Gladiator. You are not making bread. When you first mix the dough, and when you are rolling it, your goal is to be gentle. Overworking the dough develops gluten, which will fight you every step of the way, making the dough hard to roll out and resulting in a tough, chewy pastry.
- Skipping or Rushing the Chilling Steps. I know, the waiting is the hardest part. But the chilling periods are mandatory. They allow the gluten to relax (so the dough is easier to roll) and ensure the butter layers firm up completely. Patience is the most important ingredient in this recipe.
- The Aggressive Roll. If you press down too hard with your rolling pin, you can cause the butter layers to squish out the sides or burst through the dough. Use firm, even pressure and roll away from yourself. You are coaxing the dough into shape, not trying to dominate it.
Variations & Customizations (Now That You’re a Pro)
You’ve made the dough! What now? The possibilities are endless.
- Savory Herb Puff Pastry: When you first mix your flour and salt, add 2 tablespoons of finely chopped fresh herbs like rosemary, thyme, or chives, and a teaspoon of black pepper. This is incredible for making cheese straws, sausage rolls, or a pot pie topping.
- Sweet Cinnamon Sugar Puff Pastry: Before your final two turns, sprinkle the dough with a generous amount of cinnamon sugar. As you fold and roll, it will create beautiful, sweet, caramelized swirls in your finished pastry. Perfect for palmiers or elephant ears.
- Rough Puff “Croissants” (Cruxssants?): While not traditional, you can cut your finished dough into long triangles, roll them up from the wide end, and bake them into flaky, croissant-like pastries. Brush with an egg wash before baking for a beautiful shine.
Your Burning Pastry Questions, Answered

Let’s clear up some of the mystique.
What’s the real difference between this “rough puff” and classic puff pastry?
In classic puff pastry, you make a lean dough (the détrempe) and wrap it around a single, solid, perfectly shaped block of butter (the beurrage). The folding process is more precise and creates more distinct layers. Rough puff incorporates the chunks of butter directly into the dough from the start, which is much faster and easier but yields a slightly less uniform (though still incredibly flaky) result.
Can I do this entirely by hand without a pastry blender?
Yes. Use the tips of your fingers to quickly rub the cold butter into the flour. Work as fast as you can to avoid melting the butter with your body heat.
My puff pastry didn’t puff much. What went wrong?
The most likely culprit is that your butter got too warm at some point and melted into the dough. It could also be that your oven wasn’t hot enough. Puff pastry needs an initial blast of high heat to create the steam that makes it rise.
Can I freeze homemade puff pastry?
Yes! It freezes beautifully. After your final turn, wrap the dough tightly in two layers of plastic wrap and then a layer of foil. It will keep in the freezer for up to 3 months. Thaw it overnight in the refrigerator before using.
How many “turns” do I actually need to do?
A minimum of four turns is essential. Six turns will give you an even flakier, more delicate result. I wouldn’t go beyond six, as you can risk breaking the butter layers down too much.
Help! Butter is leaking out of my pastry in the oven!
This usually means the pastry wasn’t cold enough when it went into the oven, or there was a tear in the dough that allowed the butter to escape before it could create steam. Always make sure your shaped pastry is well-chilled before baking.
Is this really better than the store-bought stuff?
One hundred percent. Yes. The flavor of an all-butter homemade pastry is incomparably richer and more delicious. The texture is often flakier and more tender. It’s a night-and-day difference.
Final Thoughts

Look at you. You did it. You faced down the final boss of the baking world and you emerged victorious, holding a perfect block of homemade puff pastry. You are a master of lamination, a creator of flaky layers, a buttery wizard. The freezer aisle has no power over you anymore.
So go on. Make those palmiers. Top that pot pie. Create the most epic sausage rolls the world has ever seen. You’ve earned it. Welcome to the elite club of people who make their own puff pastry.