How to Make Naan Bread at Home (The Easy, No-Tandoor Recipe!)
The “Better Than the Restaurant” Guide on How to Make Naan Bread
Let’s be honest for a second. When you go out for a fantastic Indian meal, what’s the one thing you absolutely cannot wait to arrive at the table? The curry is amazing, the rice is fragrant, but it’s that basket of hot, pillowy, impossibly soft, slightly charred naan bread, isn’t it? You tear off a piece, steam rising, and use it to scoop up that delicious sauce… it’s pure bliss. Well, what if I told you that you could recreate that magic at home? This is your ultimate, foolproof guide on how to make naan bread, and it’s so good, you’ll never look at that sad, floppy store-bought stuff the same way again.
Forget the idea that you need a 900-degree, clay tandoor oven cemented into your backyard. We are going to achieve that glorious, bubbly, restaurant-quality texture with one simple, powerful tool: a screaming-hot skillet. Get ready to fill your home with the most incredible smell and become a flatbread legend.
Why This Recipe is an Absolute Game-Changer
So, why should you bother making this beloved bread from scratch?
- The Texture is a Revelation: Homemade naan is a completely different universe from the pre-packaged kind. This recipe creates a naan that is unbelievably soft, chewy, and pillowy, with those big, beautiful, blistered bubbles and a delightful char.
- It’s Shockingly Easy: I know, working with yeast can sound intimidating, but I promise, this dough is incredibly forgiving and simple to work with. The process is straightforward, and the active “work” time is minimal. The yeast and the hot pan do all the heavy lifting.
- You’ll Be a Dinner Party Hero: There is no greater flex than casually bringing a warm, steaming stack of freshly made, ghee-brushed naan to the table. Your guests will be floored. They will sing songs of your culinary prowess. It’s an instant upgrade to any meal.
The Ingredient List: The Anatomy of a Perfect Naan
The secret to soft, flavorful naan is a few key enriching ingredients.
- All-Purpose Flour: 3 ¼ cups, plus more for dusting.
- Instant or Active Dry Yeast: 2 ¼ teaspoons (one standard packet).
- Warm Water: ¾ cup. It should feel like a nice, warm bath on your wrist (about 110°F / 43°C).
- Warm Milk: ¼ cup.
- Full-Fat Plain Yogurt: ⅓ cup. This is a non-negotiable secret ingredient for a super soft, tender dough.
- Ghee or Unsalted Butter: 3 tablespoons, melted.
- Granulated Sugar: 1 tablespoon. A little snack to get the yeast excited.
- Salt: 1 ½ teaspoons.
- For Finishing:
- More Melted Ghee or Butter
- Optional: Chopped fresh cilantro, minced garlic, or nigella seeds.
Tools & Kitchen Gadgets: Your Naan-Making Station
You don’t need a tandoor, but one of these tools is the key to success.
- A Heavy-Bottomed Skillet: A cast-iron skillet is the absolute best choice. It gets incredibly hot and retains that heat, which is what you need to mimic a tandoor and get those beautiful bubbles and char. A heavy stainless-steel pan is a good second choice.
- A Large Mixing Bowl.
- A Stand Mixer with a Dough Hook (optional): This makes the kneading process effortless, but you can absolutely do it by hand.
- A Clean Kitchen Towel or Plastic Wrap.
- A Rolling Pin.
- A Pastry Brush.
Step-by-Step Instructions: The Path to Pillowy Perfection
Ready to create the best bread of your life? Let’s do this.
Step 1: Wake Up the Yeast
In your large mixing bowl (or the bowl of your stand mixer), combine the warm water, warm milk, and sugar. Sprinkle the yeast over the top, give it a gentle stir, and then walk away for 5-10 minutes. You’re looking for the mixture to become foamy and bubbly. This is how you know your yeast is alive and ready to work its magic.
Step 2: Make the Glorious Dough
Once your yeast is frothy, add the yogurt and melted ghee/butter to the bowl. Add about half of your flour and the salt.
- With a stand mixer: Using the dough hook, mix on low speed until combined. Gradually add the remaining flour until a soft, slightly sticky dough forms. Knead on medium speed for 5-7 minutes, until the dough is smooth and elastic.
- By hand: Mix with a wooden spoon until a shaggy dough forms. Turn it out onto a lightly floured surface and knead for 8-10 minutes, until it’s smooth, elastic, and no longer super sticky.
Step 3: The First Rise (The Magic Nap)

Form your dough into a ball and place it in a lightly oiled bowl. Cover it with a damp kitchen towel or plastic wrap. Place it in a warm, draft-free spot for 1 to 1.5 hours, or until the dough has doubled in size.
Step 4: Divide and Conquer
Gently punch down the risen dough. Turn it out onto a floured surface and divide it into 8 equal pieces. Roll each piece into a smooth little ball.
Step 5: The Power Nap
Place the dough balls on your floured surface, cover them with the towel again, and let them rest for another 10-15 minutes. This lets the gluten relax, making them easier to roll out.
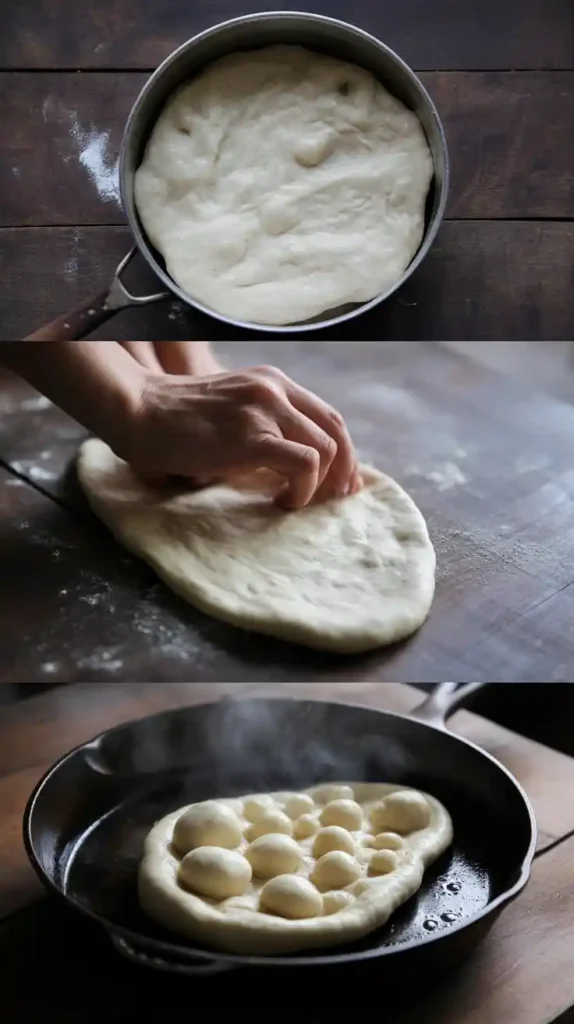
Step 6: The Roll Out
Take one dough ball at a time. On a lightly floured surface, use your rolling pin to roll it out into a thin oval or classic teardrop shape, about ⅛ to ¼-inch thick.
Step 7: The Hot Pan Sizzle (The Most Important Part)
Place your cast-iron skillet over high heat. Let it get screaming hot. I’m serious. You want it very, very hot.
Carefully place one of your rolled-out naan onto the hot, dry skillet. Cook for 1-2 minutes. You will see large bubbles start to form almost immediately. This is the magic happening!
Once the bottom has some beautiful golden-brown and charred spots, flip the naan and cook for another 1-2 minutes on the other side.
Step 8: The Finishing Touch
As soon as the naan comes off the hot pan, immediately brush it generously with melted ghee or garlic butter and sprinkle with fresh cilantro, if using. Stack the finished naan and wrap them in a clean kitchen towel to keep them warm and soft while you cook the rest.
Calories & Nutritional Info (A Delicious Carb)

- Serving Size: One glorious, hot, buttery naan.
- Calories: Approximately 250-300 kcal.
- Good For: Scooping up every last drop of delicious curry.
- Main Ingredient: Pure, unadulterated joy.
Common Mistakes to Avoid (Naan Nightmares)
- A Pan That’s Not Hot Enough: This is the #1 reason for dense, sad naan. Your skillet must be very, very hot before the dough touches it. The intense heat is what instantly turns the moisture in the dough to steam, creating those big, beautiful bubbles.
- Being Afraid of Yeast: If your water is too hot, it will kill the yeast. If it’s too cold, it won’t wake it up. The “pleasantly warm bathwater” temperature is the sweet spot. If your yeast doesn’t get foamy in Step 1, it’s dead. Start over.
- An Under-Kneaded Dough: You need to knead the dough until it’s smooth and elastic. This develops the gluten, which is what gives the naan its signature chewy texture.
- Rolling it Too Thick: If your naan is too thick, it won’t cook through in the middle before the outside burns. Aim for about ⅛ to ¼-inch thickness.
Variations & Customizations: The Naan-iverse

The classic plain naan is a thing of beauty, but here are the most popular variations.
1. The Ultimate Garlic Naan
This is a must. Finely mince 2-3 cloves of garlic and stir them into your melted ghee or butter before brushing it onto the hot, finished naan. The residual heat from the bread will gently cook the garlic, making it incredibly fragrant and delicious.
2. The Cheesy Stuffed Naan
A decadent and delicious treat. Before you roll out your dough balls, flatten one into a small disc. Place a spoonful of shredded, low-moisture mozzarella, paneer, or even a cheese string in the center. Fold the edges of the dough up and over the cheese, pinching it tightly to seal. Then, gently roll it out and cook as directed.
3. The Peshwari Naan (Sweet & Nutty)
For a sweet and savory version popular in the UK. Create a filling by mixing together finely chopped almonds, shredded coconut, and a few raisins or sultanas. Place a spoonful of this mixture in the center of your dough, seal it, and roll it out gently before cooking.
FAQ: Your Most Pressing Naan Questions
Do I really need a cast-iron skillet?
It is highly, highly recommended because it gets incredibly hot and holds that heat evenly, which is the best way to replicate a tandoor oven at home. You can use a heavy-bottomed stainless steel or non-stick pan, but you may not get the same level of char and puff.
What’s the difference between naan and pita bread?
While both are flatbreads, naan is an enriched dough, typically made with yogurt, milk, and ghee/butter, which makes it much softer, richer, and chewier. Pita is a much leaner dough, usually just made with flour, water, yeast, and salt.
Can I make the dough ahead of time?
Yes! After the first rise, you can punch the dough down, wrap it tightly, and store it in the refrigerator for up to 3 days. Just let it come to room temperature for about an hour before you divide and roll it out.
Final Thoughts
You’ve done it. You have unlocked the secret to the best, most coveted part of any Indian meal. You have harnessed the power of yeast and a hot pan to create a stack of pillowy, chewy, buttery, and absolutely perfect naan bread.

So go on. Make a big, delicious curry. Invite your friends over. And as you casually bring a warm, steaming basket of your homemade naan to the table, get ready for the compliments to roll in. You’ll never look at that sad, plastic-wrapped version at the grocery store the same way again.