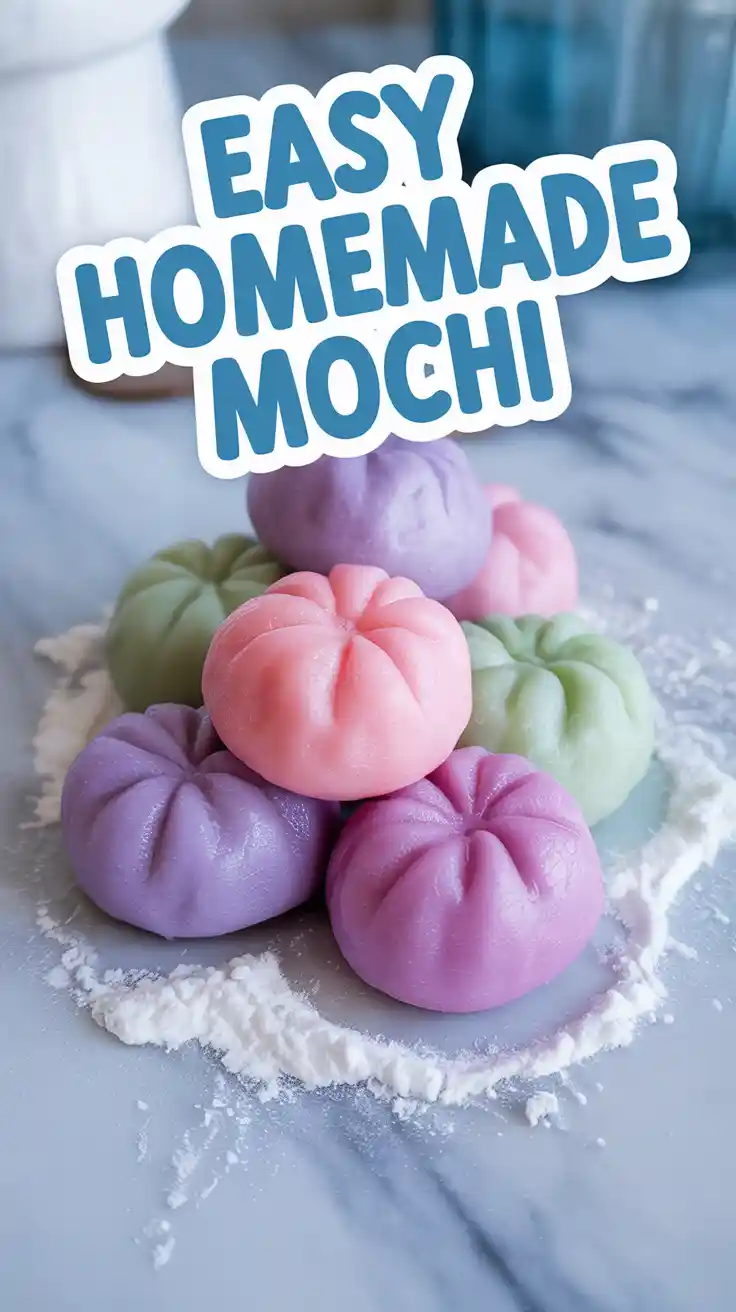
How to Make Mochi at Home (The Easy Microwave Recipe!)
How to Make Mochi at Home (The Easy Microwave Recipe!)
Have you ever bitten into a mochi? That soft, pillowy, chewy, stretchy little dumpling of joy? It seems like some kind of magical confection from another planet, with a texture that’s unlike anything else. You might think it’s a complicated, ancient secret, best left to the professionals. Well, I’m here to tell you that the magic is made in your microwave, and this guide on how to make mochi is your express ticket to a chewy, delicious wonderland.
Forget everything you think you know about needing special steamers or pounding rice for hours with giant mallets. We are hacking the system. We’re using science and a microwave to create this incredible treat in minutes.
So, are you ready to unlock the secrets to that perfect, satisfying chew? Let’s get sticky.
Why This Recipe is Awesome
If the idea of creating a delightfully chewy treat isn’t enough, here’s why this particular method is the best.
- It’s Mind-Blowingly Easy: I cannot overstate this. We are using a microwave. The total “cooking” time is about three minutes. You spend more time deciding what to watch on Netflix. This recipe is your gateway drug into the world of homemade mochi.
- The Texture is Everything: There is nothing quite like fresh, homemade mochi. It’s incredibly soft, tender, and has that signature, satisfyingly stretchy chew. It’s a dream for anyone who loves unique food textures.
- It’s a Blank Canvas: This recipe teaches you how to make the basic mochi dough. From here, the world is your oyster. You can fill it with ice cream, red bean paste, or fruit. You can color it, flavor it, and turn it into a thousand different adorable creations.
Ingredients
The list is short and specific. Pay close attention to the flour—it’s the most important player on the team!
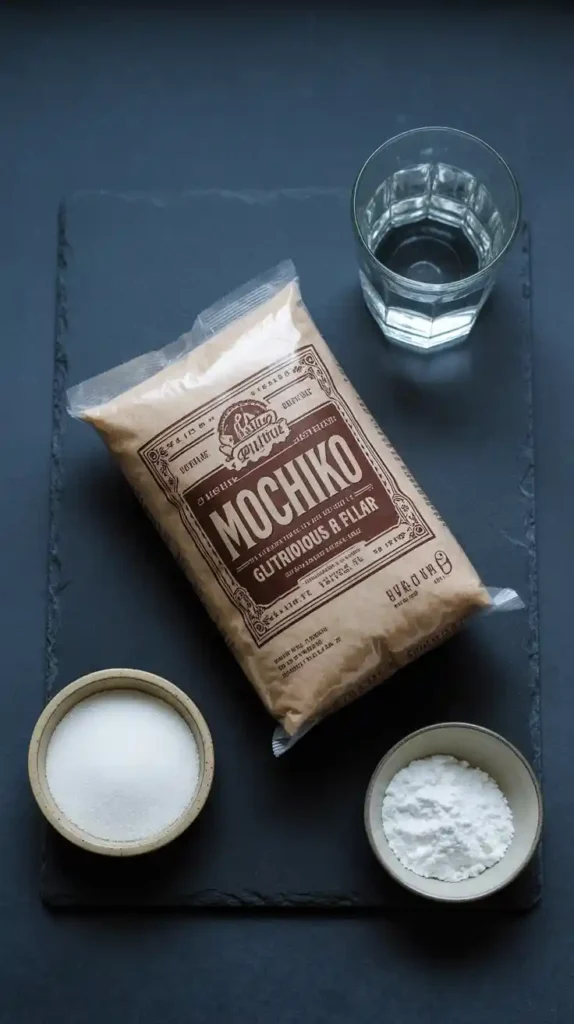
- 1 cup glutinous rice flour (also called sweet rice flour or Mochiko). This is NOT the same as regular rice flour and is non-negotiable!
- ¼ cup granulated sugar
- 1 cup water
- Cornstarch (or potato starch), for dusting. You will need a lot of this. Do not be shy.
- Optional: 1-2 drops of gel food coloring for colored mochi.
- Optional Filling: Ice cream, anko (sweet red bean paste), fresh fruit like strawberries, etc.
Tools & kitchen gadgets used
Your microwave is the star of the show today. The rest are just its supporting cast.
- A Large Microwave-Safe Bowl
- A Whisk
- A Silicone Spatula
- Microwave
- Plastic Wrap
- A Clean Work Surface (like a large cutting board or silicone mat)
- A Bench Scraper or a sharp knife
Step-by-step instructions
Alright, let’s do this. Read the steps, prep your station, and embrace the stickiness.

Step 1: Prepare for Stickiness Before you do anything else, liberally dust your clean work surface with a thick, even layer of cornstarch. And I mean liberal. Think winter wonderland. You’ll also want to dust your hands and your bench scraper. This is your only defense against the sticky power of mochi.
Step 2: Mix the Batter In your large, microwave-safe bowl, whisk together the glutinous rice flour and the sugar. Gradually pour in the water while whisking continuously to prevent lumps. Whisk until you have a smooth, thin, milky-looking batter. If you’re adding food coloring, stir it in now.
Step 3: The First Microwave Zap Cover the bowl loosely with plastic wrap (leave a small vent for steam to escape). Place it in the microwave and cook on HIGH for 1 minute.
Step 4: The First Stir Carefully remove the bowl from the microwave—it will be hot! Peel back the plastic wrap. The mixture will look like a weird, lumpy, semi-solid blob. This is correct. Dip your silicone spatula in water to prevent sticking, then stir the mixture vigorously for about 30 seconds.
Step 5: The Second Microwave Zap Re-cover the bowl and pop it back in the microwave for another 1 minute on HIGH. Remove it again and stir vigorously with your wet spatula. You’ll notice the dough is getting thicker, stickier, and more translucent.
Step 6: The Final Zap (Maybe) Cover and microwave one last time for 30 seconds. The dough should now be a single, sticky, stretchy, and semi-translucent mass. If it still looks milky or opaque in the center, give it another 30 seconds. The exact time will vary depending on your microwave’s power.
Step 7: Taming the Blob Carefully turn the hot, sticky mochi dough out onto your beautifully dusted work surface. Dust the top of the mochi blob with more cornstarch. Now, let it cool down for a few minutes until you can handle it without burning your fingerprints off.
Step 8: Shape and Cut (for plain mochi) Once it’s cool enough to handle, gently pat and stretch the dough into a flat rectangle about ½-inch thick. Use your dusted bench scraper or knife to cut the dough into small, bite-sized squares.

Step 9: The Final Dusting Toss the cut pieces of mochi in a bowl with a little more cornstarch to ensure they don’t stick together into one giant super-mochi. Your mochi is now ready to eat!
Calories & Nutritional Info
This is for a small piece of plain, unfilled mochi.
- Serving Size: 1 small square (about 1/16th of the recipe)
- Estimated Calories: Around 50-60 kcal.
- Primarily composed of: Carbohydrates.
- Good to know: It’s naturally gluten-free! (As long as your cornstarch is certified GF).
Common Mistakes to Avoid
Mochi is easy, but it has a few rules. Break them at your peril.
- Using the Wrong Flour: I’m begging you. Please read this. You must use GLUTINOUS rice flour, often sold under the brand name Mochiko. It is made from a specific type of sticky rice. Regular rice flour will NOT work. It will result in a gritty, non-stretchy paste of pure sadness.
- Being Scared of Cornstarch: This is not the time for subtlety. Your work surface, your hands, and the dough itself need a generous coating of cornstarch. If it’s sticky, the answer is always more cornstarch. It is your best friend and your only shield in this battle.
- Overcooking in the Microwave: A tough, hard mochi is an overcooked mochi. Microwaves vary in power, so keep a close eye on it. The dough is done when it’s translucent and stretchy. It’s better to undercook it slightly (and give it another 30 seconds) than to overcook it.
- Thinking It Will Last Forever: Fresh mochi is a fleeting pleasure. It’s at its softest and chewiest peak on the day it’s made. It will start to harden and lose its magical texture after that. Mochi is meant to be eaten fresh.
Variations & Customizations
The plain mochi is just the beginning. Let the real fun begin!
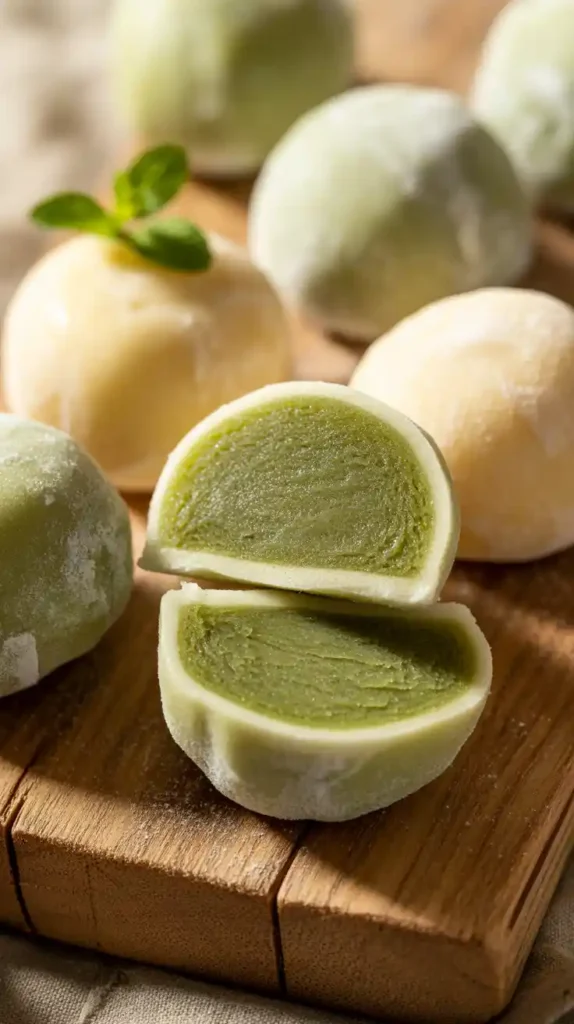
- The Holy Grail: Mochi Ice Cream: This is the ultimate goal for many. After you turn the dough out, work quickly while it’s still warm and pliable. Cut a piece, flatten it into a circle on your cornstarch-dusted palm, place a small, pre-frozen, rock-hard scoop of your favorite ice cream in the center, and quickly pull the edges up and pinch them together to seal. Wrap in plastic wrap and freeze immediately for at least a couple of hours.
- Classic Daifuku (Filled Mochi): Instead of ice cream, fill the mochi with a spoonful of anko (sweet red bean paste) or even a whole strawberry coated in a thin layer of anko.
- Flavored Mochi Dough: Add flavor directly to your dough! Whisk 1 tablespoon of unsweetened cocoa powder or 1 teaspoon of matcha powder into the dry ingredients at the beginning for a delicious chocolate or green tea mochi.
FAQ Section
All your sticky, chewy questions, answered.
1. What is mochi supposed to taste like? Plain mochi itself has a very mild, slightly sweet, milky flavor. The main event is the texture: soft, pillowy, stretchy, and chewy. The flavor usually comes from the dusting or the filling.
2. Why is my mochi so incredibly sticky? Congratulations, you did it right! Mochi is supposed to be extremely sticky. That’s its nature. The key is to manage it with a very generous amount of cornstarch (or potato starch) on your hands and work surface.
3. Can I make mochi without a microwave? Yes, the traditional method is to steam the batter. Place your bowl of batter in a steamer basket over boiling water and steam for about 15-20 minutes, stirring halfway through, until the dough is translucent. The microwave method is just much faster.

4. How do you store homemade mochi? Mochi is best eaten fresh on the same day. If you must store it, wrap each piece individually and tightly in plastic wrap and keep it in an airtight container at room temperature for up to 2 days. It will get firmer over time. Do not refrigerate plain mochi, as it will become hard. (Mochi ice cream, of course, must be stored in the freezer).
5. Is mochi gluten-free? Yes! Despite having “glutinous” in the name, glutinous rice flour contains no gluten. The name refers to the sticky, glue-like quality of the rice when cooked.
6. What’s the difference between glutinous rice flour and regular rice flour? They come from different types of rice. Glutinous rice is a “sticky rice” that has a very high starch content, which gives mochi its signature chewy, stretchy texture. Regular rice flour will not produce this texture.
7. Can I use a different sweetener instead of sugar? You can experiment, but sugar does more than just sweeten; it also affects the texture. Using a liquid sweetener would require adjusting the water amount, and results may vary. For your first time, stick with granulated sugar.
Final Thoughts
You did it! You took a few simple ingredients, harnessed the power of your microwave, and created one of the world’s most unique and delightful treats. You are now a mochi master. You’ve tamed the sticky beast and turned it into a delicious, chewy work of art.
Now go, enjoy your soft, pillowy creation. Share it with friends, fill it with ice cream, or just sit and marvel at the wonderful chewiness of it all. You’ve earned it.