The Ultimate Guide: How to Make Butter Cookies That Melt in Your Mouth
The Only Butter Cookie Recipe You’ll Ever Need (Seriously)
Let’s be honest. You’ve seen that iconic blue tin. You’ve lifted the lid, filled with hope, only to be met with… a sewing kit. The betrayal is real. But what if I told you that you could fill that tin (or any tin, for that matter) with butter cookies so divine, so perfectly melt-in-your-mouth, that you’d forget all about that needle-and-thread tragedy? This guide on how to make butter cookies is your ticket to buttery, golden-brown nirvana. Forget the store-bought stuff; we’re about to bake something legendary.
So, why are we doing this? Why not just buy a pack from the store and call it a day? Because you, my friend, deserve better. You deserve the intoxicating aroma of butter and vanilla wafting through your home. You deserve to control the ingredients, to know that what you’re eating is pure, unadulterated goodness. And frankly, you deserve the bragging rights that come with casually saying, “Oh, these? Yeah, I just whipped them up.”
These cookies are ridiculously easy to make, require a handful of pantry staples, and are the perfect canvas for your culinary creativity. They’re the little black dress of the cookie world: timeless, elegant, and perfect for any occasion. Ready to become a baking hero? Let’s do this.
Why This Recipe is Awesome
Still on the fence? Let me convince you.
- Flavor Overload: We’re talking rich, buttery flavor that’s not just a hint—it’s the main event. The vanilla adds a fragrant warmth that makes them utterly addictive.
- Texture Perfection: These aren’t your average crunchy cookies. They have a delicate, sandy, melt-in-your-mouth texture that is the hallmark of a true butter cookie. One bite and you’ll understand.
- Insanely Easy: Don’t let their elegant appearance fool you. If you can cream butter and sugar together, you can make these cookies. It’s a simple, straightforward process with seriously impressive results.
- Guest-Impressing Power: Set a plate of these out at a party, and watch them disappear. People will think you slaved away for hours or bought them from a fancy European bakery. Your secret is safe with me. 😉
Ingredients
No weird, hard-to-find ingredients here. Just pure, simple quality. Remember, with so few ingredients, their quality really matters.
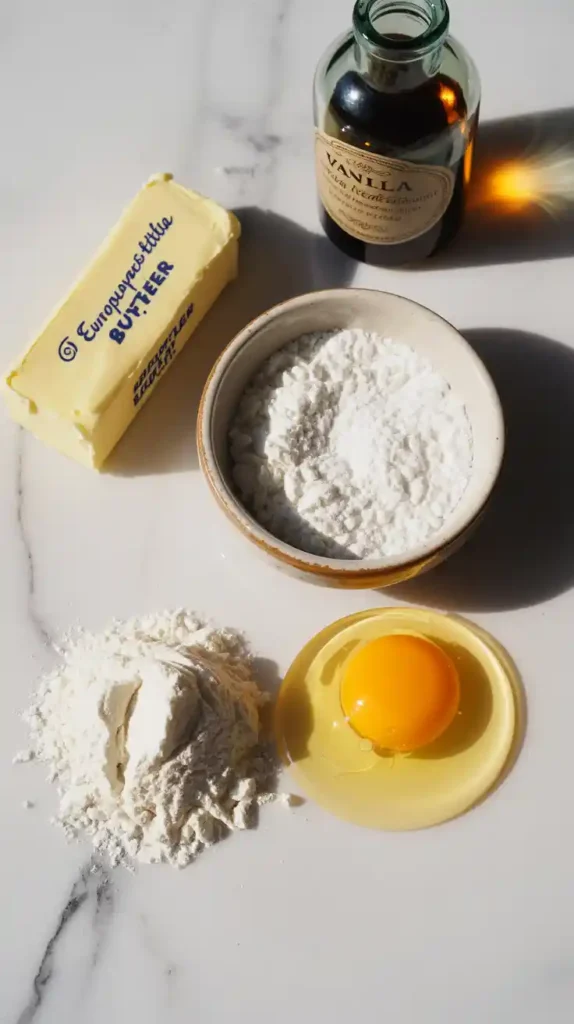
- Unsalted Butter: 1 cup (227g or 2 sticks), at room temperature. I can’t stress this enough. If your butter is cold, just walk away and come back when it’s softened.
- Powdered Sugar: 2/3 cup (80g), sifted. Also known as confectioners’ sugar. This is key for that smooth, melty texture. Don’t substitute with granulated sugar unless you want a gritty cookie.
- All-Purpose Flour: 2 cups (240g), spooned and leveled.
- Egg Yolk: 1 large. Just the yolk! It adds richness and tenderness. Save the white for an omelet or some macarons if you’re feeling fancy.
- Vanilla Extract: 2 teaspoons. Use the best quality you can afford. It makes a world of difference.
- Salt: 1/4 teaspoon. To balance the sweetness and enhance the butter flavor.
- Milk or Heavy Cream (Optional): 1-2 tablespoons, only if your dough feels too stiff to pipe.
Tools & Kitchen Gadgets Used
Having the right tools makes the job a million times easier. Here’s what I used to get those perfect bakery-style swirls.
- Stand Mixer or a reliable Hand Mixer: You need this for creaming the butter and sugar properly. Doing it by hand is a workout I don’t recommend.
- Baking Sheets: At least two, so you can have one batch in the oven while you prep the next.
- Parchment Paper or Silicone Baking Mats: For a non-stick surface and easy cleanup. A true game-changer.
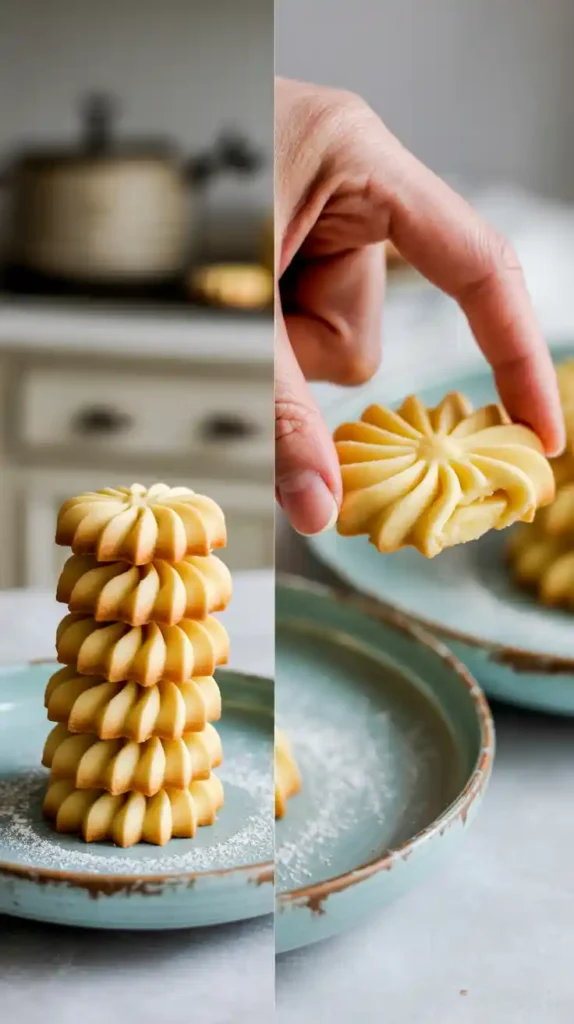
- Piping Bag and a Large Star Tip: I use a Wilton 1M tip for that classic rosette look. This is the secret to making them look professional.
- Kitchen Scale: For baking, accuracy is everything. A scale ensures your flour-to-butter ratio is perfect every time.
- Mixing Bowls: You’ll need a large one for the main dough and a smaller one for your dry ingredients.
- Rubber Spatula: For scraping down the sides of the bowl. Don’t leave any of that buttery goodness behind!
- Wire Cooling Rack: To let your cookies cool properly and prevent them from getting soggy on the bottom.
Step-by-Step Instructions
Alright, aprons on. It’s time for the magic. Follow these steps, and I promise you won’t mess it up.
- Prep Your Station: Preheat your oven to 350∘F (175∘C). Line two baking sheets with parchment paper. Get all your ingredients measured and ready to go. This is called mise en place, which is French for “get your act together.”
- Cream the Butter and Sugar: In the bowl of your stand mixer (or a large bowl with a hand mixer), beat the room temperature butter on medium speed until it’s smooth and creamy. Add the sifted powdered sugar and salt, and beat on medium-high for about 3-4 minutes, until it’s very light, pale, and fluffy. Scrape down the sides of the bowl a couple of times. Do not skip this step! This is where you incorporate the air that makes the cookies light.
- Add the Good Stuff: Add the egg yolk and vanilla extract to the butter mixture. Beat on medium speed until everything is just combined, about 30 seconds.
- Flour Power: Add the flour to the wet ingredients all at once. Mix on the lowest speed possible until the flour is just incorporated. Seriously, stop as soon as you don’t see any more dry streaks. Overmixing develops gluten, and we’re making tender cookies, not tough bread.
- Check the Consistency: The dough should be soft and pipeable. If it feels overly stiff, add 1 tablespoon of milk or cream and mix briefly. Only add a second tablespoon if absolutely necessary.
- Time to Pipe: Transfer the dough to a piping bag fitted with a large star tip (like the Wilton 1M). Pipe 1.5 to 2-inch rosettes or swirls onto your prepared baking sheets, leaving about 2 inches of space between each cookie. They will spread a little.
- The Secret Chill: For extra sharp, defined cookies that don’t spread into buttery blobs, place the entire baking sheet of piped cookies into the refrigerator for 15-20 minutes before baking. This is my secret weapon.
- Bake to Golden Perfection: Bake for 13-15 minutes, or until the edges are a light golden brown. The centers should still look pale. Keep a close eye on them; they can go from perfect to burnt in a New York minute.
- Cool Down: Let the cookies cool on the baking sheet for 5 minutes before carefully transferring them to a wire rack to cool completely. They are fragile while warm!
Calories & Nutritional Info
Let’s be real, these are butter cookies. They’re a treat, not a health food. But for those who are curious, here’s a rough estimate per cookie (assuming the recipe makes about 3 dozen).
- Calories: Approximately 70-85 kcal per cookie.
- Fat: Around 5g. Yes, that’s where the flavor comes from.
- Carbohydrates: Roughly 6g.
- Sugar: About 3g.
- Protein: Less than 1g.

Note: This is an estimate and can vary based on cookie size and specific ingredients used. Enjoy them in moderation… or don’t. I’m not your boss.
Common Mistakes to Avoid
I’ve made all the mistakes so you don’t have to. Pay attention to this section, folks.
- Using Cold Butter: Did I mention this already? If you use cold butter, it won’t cream properly with the sugar, resulting in dense, lumpy cookies. It’s a tragedy. Just let it sit on the counter for an hour. Please.
- Overmixing the Flour: If you beat the dough like it owes you money after adding the flour, you’ll get tough, sad cookies. Mix just until combined. We want tenderness, not chewiness.
- Skipping the Chill: Impatient, are we? Chilling the piped dough helps the cookies hold their beautiful shape. Skip it, and you risk them spreading into thin, flat, albeit still delicious, discs.
- Overbaking: The line between “golden brown” and “sadly burnt” is razor-thin. Pull them out when the edges are just starting to color. They will continue to bake a little on the hot pan.
Variations & Customizations
Think of this recipe as your base camp for Mount Delicious. Here are a few ways to switch things up.
- Chocolate-Dipped Dream: Once the cookies are completely cool, melt some good-quality dark, milk, or white chocolate. Dip half of each cookie into the melted chocolate and place it on parchment paper to set. Add sprinkles before the chocolate hardens if you’re feeling festive.
- Zesty Lemon & Poppy Seed: Add the zest of one lemon and 1 tablespoon of poppy seeds to the creamed butter and sugar mixture. It creates a bright, fresh flavor that’s perfect for spring.
- Cozy Spiced Chai: Add 1.5 teaspoons of a chai spice blend (cinnamon, cardamom, ginger, cloves, nutmeg) along with the flour. It turns these cookies into the perfect companion for a cup of tea on a chilly day.
FAQ Section
Here are answers to some questions you might be frantically Googling mid-bake.
Why did my butter cookies spread so much?
This is the number one issue! It’s usually due to two things: your butter was too soft (melty instead of room temperature) or you skipped the chilling step. Chilling the piped dough solidifies the butter, so it melts slower in the oven, helping the cookie hold its shape.
Can I make butter cookies without a piping bag?
Absolutely! While piping gives them that classic look, you can use a cookie press. Alternatively, you can form the dough into a log, wrap it in plastic, chill it for at least an hour until firm, and then slice it into 1/4-inch rounds (a “slice-and-bake” style). The texture will be slightly denser but still delicious.
How do I store butter cookies?
Store them in an airtight container at room temperature for up to a week. That is, if they last that long. Let’s be honest, they probably won’t.
Can I freeze butter cookie dough?
Yes! This is a fantastic time-saver. You can freeze it in two ways. Either pipe the cookies onto a parchment-lined sheet, freeze them until solid, and then transfer the frozen, unbaked cookies to a freezer bag for up to 3 months. Bake directly from frozen, adding a couple of extra minutes to the baking time. Or, freeze the dough as a log and slice and bake when ready.
Why are my butter cookies hard instead of tender?

Nine times out of ten, this is because the dough was overmixed after adding the flour, developing too much gluten. The other culprit could be overbaking. Remember, pull them out when the edges are just golden.
What’s the best butter to use for cookies?
For the best flavor, use a high-quality, European-style unsalted butter. These butters have a higher fat content (and less water), which results in a richer taste and more tender texture.
Can I make these gluten-free?
You can try! Use a good-quality 1-to-1 gluten-free baking flour blend that contains xanthan gum. The texture might be slightly different—a bit more delicate or crumbly—but they should still be delightful.
Final Thoughts
There you have it. You are now armed with the knowledge to create butter cookies that will make friends, family, and even your mail carrier swoon. Once you’ve tasted these homemade marvels, you’ll see that blue sewing tin for what it is: a missed opportunity. Go forth and bake! And when you do, snap a picture and show off your glorious creations. You’ve earned it.