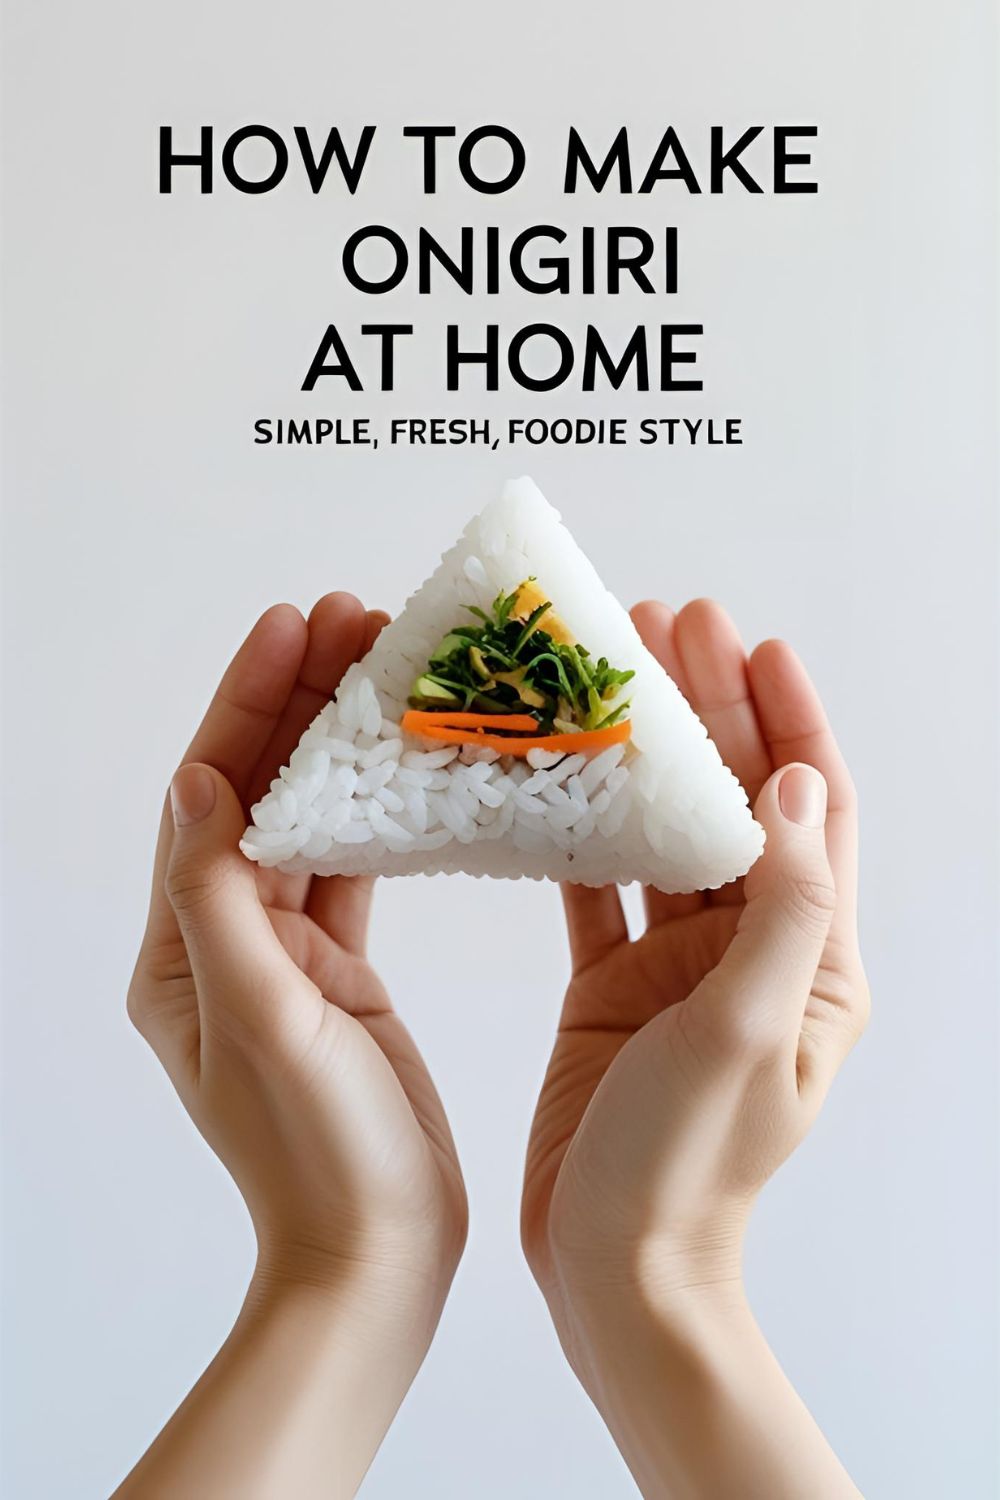
How to Make Onigiri (Japanese Rice Balls) for Beginners
How to Make Onigiri (Japanese Rice Balls) for Beginners
You’ve seen them everywhere. In the hands of your favorite anime characters, packed lovingly into bento boxes on social media, in the travel photos of your coolest friend who just got back from Tokyo. Those perfect, adorable, triangular parcels of rice, hugged by a crisp little jacket of seaweed. They look so simple, so perfect, so… utterly and completely unachievable for a mere mortal in a regular kitchen.
I am here today to tell you that is a lie. A delicious, starchy lie. If you can cook a pot of rice and you possess a functioning pair of hands, you have all the necessary qualifications to create these amazing Japanese rice balls. Today, my friend, you’re going to learn how to make onigiri, the ultimate Japanese comfort food, and your lunchbox is about to get a serious, envy-inducing upgrade.
Why This Recipe Is Your New Favorite Thing
So, why should you dedicate a little time to squishing rice into triangles? The reasons are as compelling as the snack itself.
First, onigiri are the undisputed champions of portable food. They are the original grab-and-go meal. They’re neat, they’re tidy, they’re not messy, and they are a perfectly satisfying, self-contained snack or light lunch. They are, in short, everything your sad desk sandwich wishes it could be.
Second, they are infinitely customizable. Once you master the simple art of making the rice ball, the world is your oyster… or, well, your tuna mayo filling. You can stuff them with anything your heart desires—salty, savory, spicy, or sour. It’s a choose-your-own-adventure in a tidy, rice-based package.
Finally, the process is incredibly fun and therapeutic. There’s something deeply satisfying about working with warm, sticky rice. The rhythmic process of shaping the onigiri with your hands is tactile and strangely calming. It’s a fun kitchen project that yields a delicious, practical result.
The A-List Ingredients
The soul of onigiri is the rice. The rest is just a delicious supporting cast.
For the Rice (The Most Important Part):
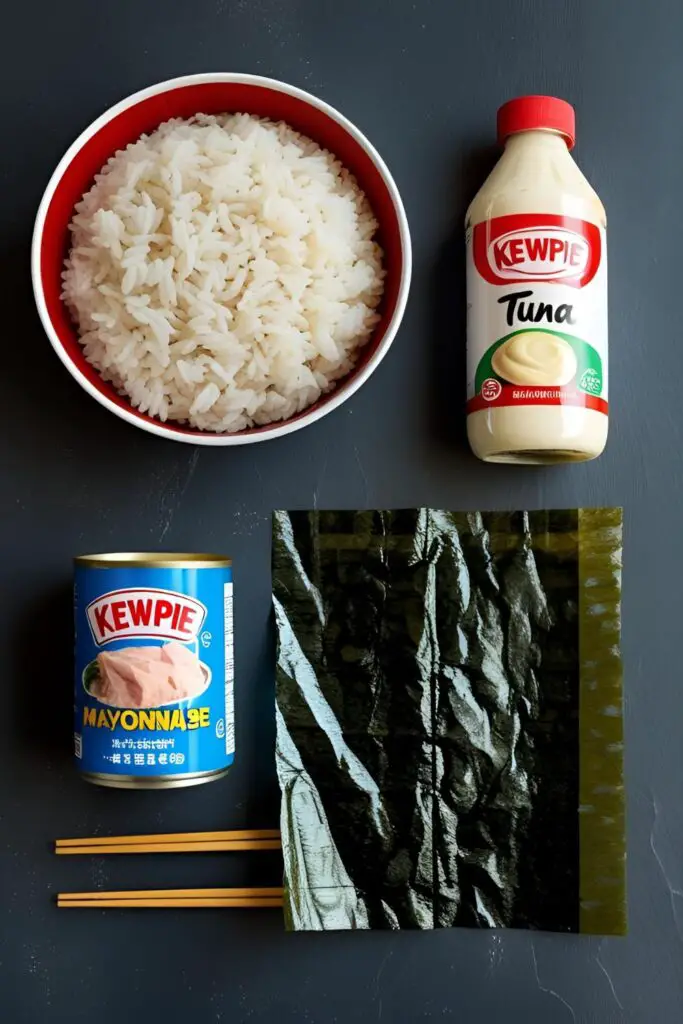
- Japanese Short-Grain Rice (Sushi Rice): 2 cups. This is 100% non-negotiable. Do not, under any circumstances, try to use long-grain rice like Basmati or Jasmine. It does not have the necessary starch content and will not stick together.
- Water: For cooking the rice (check your rice cooker or package instructions, usually a 1:1 or 1:1.2 ratio).
- Salt: About 1 teaspoon for seasoning the rice, plus more for your hands.
For a Classic Tuna Mayo Filling:
- Canned Tuna: 1 can (5 ounces), drained very well.
- Japanese Mayonnaise (like Kewpie): 2-3 tablespoons. Its tangy, rich flavor is superior here, but regular mayo works in a pinch.
- Soy Sauce: 1 teaspoon, or to taste.
- A pinch of sugar or a dash of mirin (optional): To balance the flavors.
For Assembly:
- Nori (Dried Seaweed Sheets): Cut into strips, about 1-inch wide and 3-4 inches long.
The Onigiri-Maker’s Toolkit

You can absolutely make these with just your hands, but a few tools make the process much smoother and more professional.
- A Rice Cooker: While you can cook the rice on the stove, a good rice cooker makes getting perfectly cooked, fluffy, and sticky Japanese rice a completely foolproof process.
- A Large Bowl or a Hangiri (Wooden Sushi Rice Bowl): You need a wide, shallow vessel to cool the rice properly.
- A Rice Paddle (Shamoji): A flat plastic or wooden paddle is the best tool for fluffing and handling sticky rice without mashing it.
- A Small Bowl: For the salted water you’ll use to wet your hands.
- Onigiri Molds (Optional but AMAZING for beginners): These little plastic triangle molds take all the guesswork out of shaping and give you perfectly uniform onigiri every single time. It’s a fantastic training-wheels tool.
- Kitchen Shears: For neatly cutting your nori sheets into strips.
Step-by-Step: The Path to Perfect Rice Balls
The process is simple, but each step is important. Respect the rice, and the rice will respect you.
Phase 1: The Rice is Everything
- Wash Your Rice: Place your 2 cups of short-grain rice in a bowl. Cover it with cold water, swish it around vigorously with your hand, and then pour off the cloudy, starchy water. Repeat this process 3-4 times, until the water runs mostly clear. This is a crucial step for a clean flavor and fluffy texture.
- Cook the Rice: Drain the washed rice well and place it in your rice cooker. Add the appropriate amount of water according to the machine’s instructions. Turn it on and let it work its magic. (If cooking on the stove, follow package directions carefully).
- Let it Steam: Once the rice cooker clicks off, do not open the lid. Let the rice sit and steam in its own residual heat for at least 10-15 minutes. This allows the moisture to distribute evenly and finishes the cooking process.
Phase 2: Prepping Your Station
- Cool and Season the Rice: Transfer the hot, cooked rice to a large, wide bowl. Use your rice paddle to gently “cut” and fold the rice, fluffing it up to release some of the steam. Let it cool for 10-15 minutes, until it’s still warm but comfortable to handle. Sprinkle the teaspoon of salt over the rice and gently fold it in.
- Make Your Filling: While the rice cools, mix your drained tuna, mayonnaise, and soy sauce in a small bowl.
- Set Up Your Assembly Line: Get everything ready: your bowl of warm rice, your bowl of filling, your cut nori strips, and one more small bowl filled with water and a good pinch of salt dissolved in it.
Phase 3: The Shaping Ritual
- THE MOST IMPORTANT STEP: Wet Your Hands. Dip your hands into the bowl of salted water. This does two critical things: the water prevents the rice from sticking to your hands, and the salt lightly seasons the outside of the onigiri.
- Form the Base: Scoop a small handful of warm rice (about ½ to ¾ cup) into one of your wet palms. Gently flatten it into a thick disc.
- Fill it Up: Use your thumb to create a small indent in the center of the rice disc. Place about a tablespoon of your tuna mayo filling into the indent.
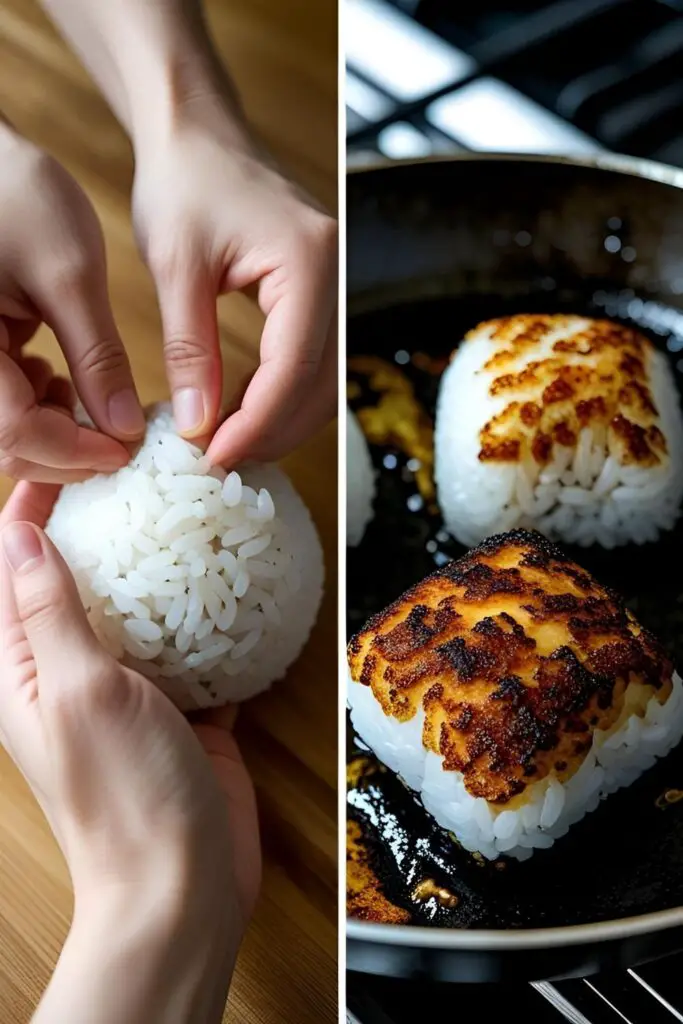
- Seal and Shape: Bring the edges of the rice up and around the filling, adding a little more rice on top if needed to seal it completely. Now, begin to gently but firmly press the rice ball together.
- The Triangle Technique: Cup your hands to form a “V” shape. Place the rice ball in the crook of your hands and use the base of your palms and your fingers to gently press and rotate the ball, forming it into the classic triangular shape. It might take a few tries to get the hang of it!
- The Nori Hug: Take one of your nori strips and wrap it around the bottom edge of the onigiri. The moisture from the rice will help it stick. The nori acts as a convenient, non-sticky handle.
Calories & Nutritional Info (A Humble Snack)
Onigiri are a wholesome and satisfying snack. This is a rough estimate for one tuna mayo onigiri.
- Estimated Calories: Around 200-250 kcal per onigiri.
- A Balanced Bite: You get complex carbohydrates from the rice for sustained energy, and protein and fat from the tuna filling to keep you full.
- Naturally Low in Fat: The base of onigiri (rice) is virtually fat-free. The overall fat content will depend on your choice of filling.
Common Onigiri Blunders to Avoid
Don’t let these simple mistakes turn your beautiful rice balls into a sad, crumbly mess.
- Using the Wrong Kind of Rice. I will say it until I am blue in the face. If you try to make onigiri with long-grain rice like Jasmine or Basmati, it will not work. It does not have the right starch structure. You will have a frustrating pile of individual rice grains that refuse to be friends. You must use Japanese short-grain rice.
- The “Hot Hands” Problem. Trying to shape rice that is piping hot, fresh out of the cooker is a recipe for scorched fingertips and misery. You must let the rice cool until it is just comfortably warm to the touch.
- The Sticky-Fingered Fiasco. If you forget to wet your hands, you will instantly regret it. The rice will stick to every square inch of your palms and fingers, creating a gooey, frustrating mess. The salted water hand-dip is not a suggestion; it is the law of onigiri.
- The Death Grip vs. The Gentle Squeeze. There is a fine line here. You need to press the onigiri firmly enough that it holds its shape and doesn’t fall apart. However, if you use a crushing “death grip,” you will mash the individual grains of rice into a dense, pasty puck. Aim for a firm but gentle squeeze.
Variations & Customizations (The Filling-verse is Limitless)
The tuna mayo filling is just the beginning. Onigiri are a canvas for your creativity.
- Classic Salted Salmon (Shake) Onigiri: A hugely popular and traditional filling. Simply take a piece of cooked salmon (baked or pan-fried), flake it apart with a fork, and mix it with a good pinch of salt.
- Tangy Pickled Plum (Umeboshi) Onigiri: For a classic, bold, vegetarian flavor. Umeboshi are very salty and sour pickled Japanese plums. You only need to place a small piece of the pitted plum in the center of the rice ball.
- Crispy Grilled Onigiri (Yaki Onigiri): This is a game-changer. Make your onigiri either plain or with a savory filling. Mix together a simple glaze of soy sauce and a little mirin (sweet rice wine). Brush the glaze onto both sides of the onigiri and then pan-fry them in a lightly oiled skillet over medium heat for a few minutes per side, until they form a crispy, golden-brown, and savory crust.
Your Burning Rice Ball Questions, Answered

Let’s clear up some of the most common onigiri curiosities.
What’s the difference between onigiri and sushi?
This is the most common question! While they both involve rice, sushi rice is seasoned with a mixture of vinegar, sugar, and salt, and it almost always involves raw fish or other specific ingredients. Onigiri rice is typically just plain steamed rice that is lightly salted, and the fillings are usually cooked or preserved items.
Do I absolutely have to use Japanese short-grain rice?
Yes. Or at the very least, a high-quality “sushi rice” from another origin (like Calrose rice from California). The high starch content and sticky quality are essential for the onigiri to hold its shape.
How do I keep the rice from sticking to my hands?
I know I keep repeating it, but it’s the most important tip: Dip your hands in salted water before you handle the rice. Re-wet your hands between each onigiri.
What are some other easy filling ideas for onigiri?
The possibilities are endless! Try seasoned ground chicken or beef, canned salmon mixed with a little miso, scrambled eggs with a bit of soy sauce, or even just some furikake (a Japanese rice seasoning blend) mixed directly into the rice.
Can I make onigiri ahead of time?
You can, but with a major caveat. Rice becomes hard and dry when it’s refrigerated. Onigiri are at their absolute best when they are made and eaten the same day at room temperature. If you must make them the night before, wrap them very tightly in plastic wrap to keep them from drying out.
How should I store onigiri?
Store them at room temperature, tightly wrapped in plastic wrap, and eat them the same day. Avoid refrigerating them if at all possible.
Help! My onigiri keeps falling apart!
This is likely due to one of three things: 1) You used the wrong kind of rice, 2) Your rice was too wet or too dry, or 3) You didn’t press the rice ball together firmly enough during the shaping process.
Final Thoughts

You’ve done it. You’ve transformed a simple bowl of rice into a perfect, portable, and ridiculously delicious work of art. You have mastered one of Japan’s greatest and most beloved comfort foods. You are now an official onigiri-making expert.
So go on, pack one (or three) for your lunch tomorrow. Take a bite of your beautifully shaped, perfectly seasoned creation and make all of your coworkers jealous of your superior lunch game. You’ve earned it.