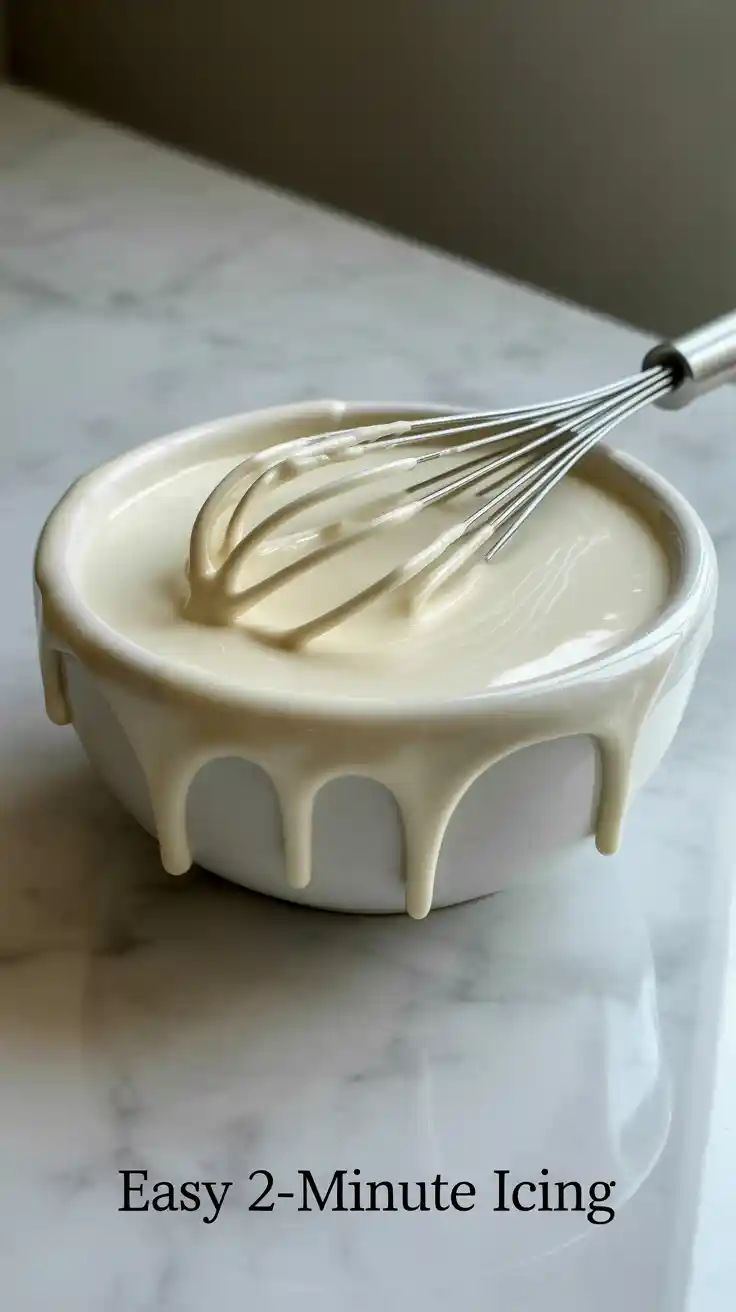
How to Make Icing in 2 Minutes (The Easiest Recipe Ever!)
How to Make Icing in 2 Minutes (The Easiest Recipe Ever!)
Let’s clear the air. Frosting. Glaze. Icing. What’s the deal? Are they all the same? Not really. But today, we’re cutting through the confusion and getting straight to the good stuff. If you want to know how to make icing—the simple, elegant, drizzle-able kind that elevates everything from a humble sugar cookie to a glorious cinnamon roll in mere seconds—you have come to the right place.
This isn’t a recipe for a big, fluffy pile of buttercream. This is your emergency “Oh crap, I forgot to decorate these,” “I have exactly three minutes before people arrive,” and “I just need a little something extra” recipe. It’s the easiest, most versatile finishing touch in the entire baking universe, and you’re about to master it.
So, are you ready to unlock the power of the perfect drizzle, dip, and spread? Let’s get you covered.
Why This Recipe is Awesome
In a world of complicated, multi-step baking projects, this simple icing is a glorious breath of fresh air. Here’s why it’s about to become your new best friend.
- It’s Unbelievably Fast and Easy: I am not exaggerating when I say this takes two minutes, tops. Do you own a bowl? Do you have a fork or a whisk? Can you measure two, maybe three, ingredients without causing a major incident? Congratulations, you have all the advanced culinary skills required to make this icing.
- The Perfect Finishing Touch: Sometimes, a big, fluffy pile of frosting is just too much. This simple icing adds the perfect touch of sweetness and a beautiful, shiny finish that sets firm to the touch. It enhances your baked good; it doesn’t completely overpower it. It’s the definition of simple elegance.
- It’s Infinitely Adaptable: This recipe is less of a strict set of rules and more of a guiding principle. You can change the consistency from a thin, crackly glaze to a thicker, spreadable icing with almost zero effort. You are the master of your own icing destiny.
Ingredients
The ingredient list is so short and simple, you probably have everything you need in your pantry right now, just waiting for this moment of glory.
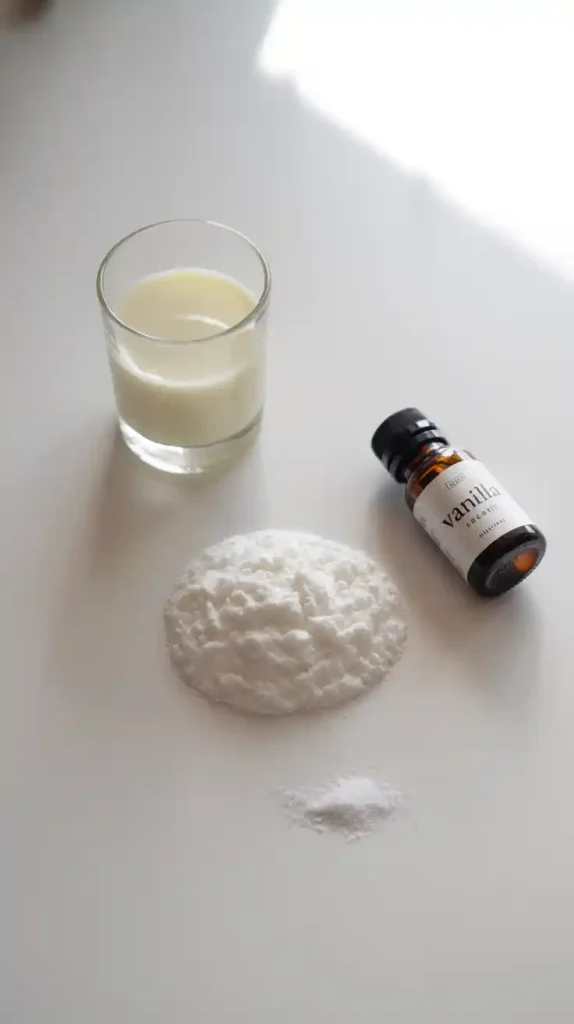
- 2 cups powdered sugar (also known as confectioners’ sugar or icing sugar), sifted
- 3-4 tablespoons milk (or another liquid of your choice, like water, lemon juice, or even coffee)
- 1 teaspoon pure vanilla extract
- A tiny pinch of salt
Tools & kitchen gadgets used
Prepare to be underwhelmed in the best way possible. This is the definition of a low-tech, high-reward situation.
- A Medium Mixing Bowl
- A Whisk (or a simple fork, if you’re feeling particularly minimalist)
- A Sifter or Fine-Mesh Sieve (This is the real secret to lump-free icing!)
- Measuring Cups and Spoons
Step-by-step instructions
Blink and you might miss it. This is quite possibly the easiest, fastest recipe you will ever make.

Step 1: Sift Your Sugar (The Non-Negotiable Step) Place your sifter or fine-mesh sieve over your mixing bowl. Pour the powdered sugar in and sift it directly into the bowl. Yes, all of it. This breaks up all the little clumps and lumps that are secretly hiding in the bag, which is the one and only secret to getting a perfectly smooth, silky icing. Do not skip this. I will know if you do. Your lumpy icing will tell on you.
Step 2: Add the Liquids and Flavor Add the vanilla extract, the pinch of salt, and start with 3 tablespoons of the milk. It is absolutely crucial that you hold back a little of the liquid. You can always add more, but you can’t easily take it away without turning this into a massive science project.
Step 3: Whisk It Good Now, grab your whisk and mix everything together. At first, it might seem really thick, like a stiff paste. Don’t panic! Keep whisking, and it will magically come together into a smooth, opaque icing. Make sure you scrape the bottom and sides of the bowl to get everything incorporated.
Step 4: Become the Artist (Adjust the Consistency) This is where you take control. Dip your whisk in and let the icing drizzle off. Is it too thick? Add the last tablespoon of milk, or even just a teaspoon at a time, whisking well after each addition, until it reaches the perfect consistency. Is it too thin and watery? Add more sifted powdered sugar, a tablespoon at a time, until it thickens up. You’re looking for a consistency like honey for drizzling, or like smooth peanut butter for spreading. That’s it. You’re done. You made icing. Go you.
Calories & Nutritional Info
It’s essentially sugar in a liquid, spreadable form. Let’s just own it and enjoy the moment.
- Serving Size: 1 tablespoon
- Estimated Calories: Around 60-70 kcal.
- Contains: Pure, unadulterated sugar.
- Perfect For: Making delicious things even more delicious and beautiful. This is a valid nutritional goal, in my opinion.
Common Mistakes to Avoid
This recipe is simple, but there are a few ways to veer off the path to sweet, sweet success. Let’s keep you on the straight and narrow.
- Refusing to Sift the Powdered Sugar: I will die on this hill. If you just dump the powdered sugar straight from the bag, you will have lumpy icing. You will whisk until your arm falls off, and you will still have lumpy icing. Lumpy icing is sad icing. Sift your sugar.
- Adding All the Liquid at Once: You will go from a thick, controllable paste to a watery, translucent, and heartbreaking mess in a heartbeat. It’s so much easier to thin an icing out than it is to thicken it back up. Always start with less liquid than the recipe calls for and add more, drop by drop, until you reach that perfect consistency.
- Forgetting the Salt: I know it sounds crazy to add salt to something that’s supposed to be pure sweetness, but trust me. That tiny pinch of salt is the magic ingredient that balances the flavor and keeps it from tasting like a one-note sugar bomb. It makes the vanilla or other flavorings pop. It’s a game-changer.
- Using Granulated Sugar by Mistake: This recipe specifically calls for powdered/confectioners’ sugar. Granulated sugar will not dissolve in the cold liquid, and you will end up with a crunchy, sandy, deeply unpleasant sludge. Don’t do it.
Variations & Customizations
This basic recipe is your playground. Now go have some fun and make it your own.
- Zesty Citrus Glaze: This is a classic for a reason. Instead of milk and vanilla, use an equal amount of freshly squeezed lemon, lime, or orange juice. Add a teaspoon of finely grated zest for an extra pop of bright, fresh flavor. This is absolutely perfect for drizzling over Bundt cakes, scones, or pound cake.
- Rich Coffee Icing: Who needs a latte when your dessert can have one? Replace the milk with an equal amount of cooled, strong-brewed coffee or espresso. This is ridiculously good on coffee cake, chocolate donuts, or anything that needs a little pick-me-up.
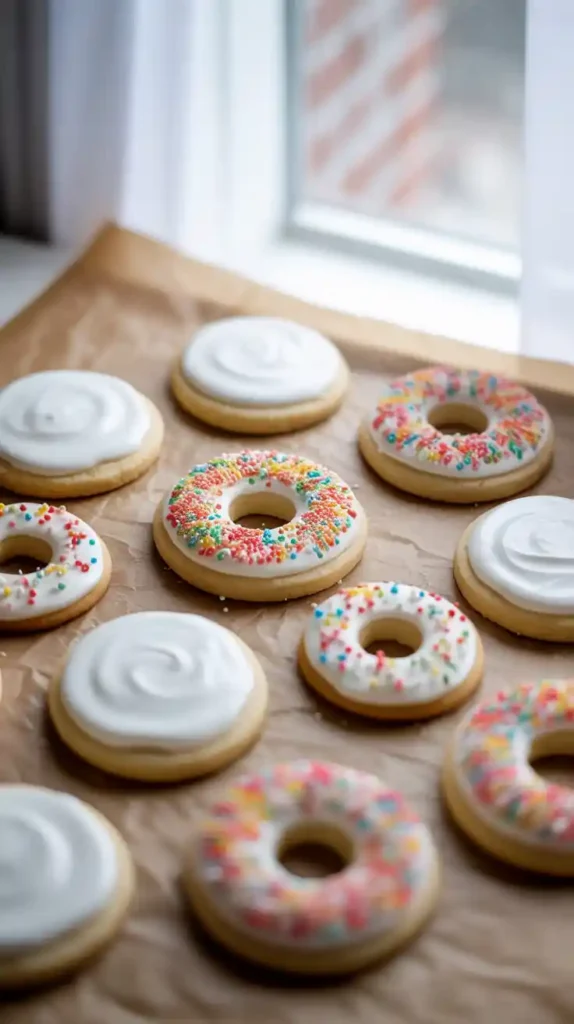
- A World of Color: This white icing is the perfect blank canvas for your artistic expression. Add one single drop of gel food coloring and stir to see the color. Add more, drop by drop, to reach your desired shade. This is perfect for decorating holiday sugar cookies or birthday treats.
FAQ Section
All your icing-related inquiries, answered in a flash.

1. What is the real difference between icing and frosting? Generally speaking, “icing” (like this recipe) is thinner, often made with just powdered sugar and a liquid, and it sets up firm or hard to the touch. “Frosting” (like a buttercream) is thicker, fluffier, contains a fat like butter or cream cheese, and stays soft.
2. How do I make this icing harden? This simple powdered sugar icing will naturally set and form a firm, dry-to-the-touch shell as the water in the liquid evaporates. The thinner the glaze, the more of a “crackly” shell it will have when you bite into it.
3. My icing is too thin! How do I fix it? Easy! Just whisk in more sifted powdered sugar, a tablespoon at a time, until it reaches the thickness you want.
4. My icing is too thick! How do I fix it? Even easier! Add more of your liquid (milk, lemon juice, etc.), a tiny splash at a time (like, ½ a teaspoon), and whisk until it thins out to your desired consistency.
5. Can I make icing without a mixer? Yes! This is the perfect recipe for that. A simple bowl and a whisk or even a fork are all you need to get a perfectly smooth result. No heavy machinery required.
6. How should I use this icing? You can drizzle it over cakes and muffins with a spoon, dip the tops of cookies or donuts directly into the bowl, or use a small offset spatula or knife to spread a thin, even layer.
7. How long does this icing last? It’s best used immediately after it’s made, as it will start to form a crust. If you need to store it, place it in an airtight container with a piece of plastic wrap pressed directly onto the surface of the icing and keep it at room temperature for up to 2 days. You may need to give it a good whisk again before using.
Final Thoughts
And there you have it. The simplest, most versatile, most useful secret weapon in your entire baking arsenal. You now know how to transform any plain, naked baked good into a beautifully finished work of art in about the same amount of time it takes to brew a cup of tea.

You are now an icing expert. Go forth and drizzle, dip, and decorate with the confidence of a seasoned pastry chef. The possibilities are endless, and your desserts will never be boring again.